Bikesure_adrianflux

Monster 900Sie 50000mile refresh.

Thanks Tim and Rob for the good info and support.
All the GSXR 1000 discs I've found have 5 holes and no mention of the offset, But I do know that some GSXR parts are interchangeable with Ducati.

I think Nasher and I have come up with a plan. Watch this space. :mand:
 
That means of course that using the 15mm offset discs the discs will be 2mm further apart, or in other words 1mm further out, or offcentre to the radial calipers.
I've looked at the setup I've done on both my 1000ss and M1000, and both would easily accommodate this, but are slightly different.

When I fitted the HPK discs to the 916, I recall having to alter the alignment slightly by altering the RH spacer.

IIRC I got a new alloy spacer made at around 0.5mm bigger than the original (which is why I've got the steel spacers spare) and the reason for this is the HPK discs are 6mm thick rather than 5mm of the 748R and other Ducati discs whereas the inside of the caliper is only around 7-8mm, so alignment is critical so as not to touch the caliper body with the disc.

In hindsight I think they were just OK and not touching but my OCD wouldn't let it go that close but, being full floating I imagine they would find a way to clear anyway?

Otherwise I think you'll find the 15mm offset will be fine but if not you can just alter it by machining down the spacers or fitting thicker spacers/adding shims, the only potential fly in the ointment is the speedo drive might not be easy to machine but maybe you could remove material from the inside of the fork leg or the wheel if absolutely required? but, that should only be the case if you needed a narrower stance and it sounds like you may need it wider?

This is a 748R disc BTW;

2671-1393843077-4dddad7e64707df093ba2dbe26e611c1.jpg


Let me know if you need any measurements.
 
Last edited:
Thanks for all the info DD. It has pulled it all into focus.

Quite exhausted by it all actually, not sure whether to persevere with the new front end or not!
I did get all the paint off one of my tanks though. I bought some paint stripper from Screwfix and might as well have put yoghurt on the tank!!
Dacs' strong stuff was much better.
In the end I finished it with 80grit and wire brushes which was quicker and cleaner altogether than paint stripper.
So that's how the other tank will be stripped.
 
Last edited:
Thanks for the info Rob.
I've decided to stick with my original adjustable Showas which are in good nick and have been recently overhauled by MCT. They are set up well and I'm happy with their performance and looks.
The cost of all the parts needed to get the radials working with the speedo had spiralled out of control, so I cashed in my chips.
Shame, as those callipers looked gorgeous on those forks.
Darren is going to take them on and will have a much easier time of it with no speedo.
I've also taken some 65mm 4 pad callipers in exchange, from a 999 I think? They might perk the brakes up a little and not stray from the Sie original looks too far.

I wish I had more energy to get into the workshop in the evenings though. Work is heavy at the moment and I'm finding it exhausting!
 
Those P4 calipers should in theory provide as much power as the radial ones would. Maybe at some point in the future you could upgrade to hybrid 996 style forks?
 
Yes looking forward to the P4's Darren. :thumbsup:

Today I set about sanding the paint off the Monster's tank.
This was achieved within 3 working hours with a break in the middle for a stonking ride on dry roads in 14 degrees of February heat. No heated clothing and I even switched the heated grips off. I wonder how long it will be before it's back that warm again?

I used my Festool sander with just 150g pads on a soft backing pad. With extraction attached there was no mess and tank is all clean and back to metal.
I think it took about two weeks with stripper and scrapers to do the other one, not to mention the mess and destruction of my soul! Lesson learned.

It has revealed a big dent repair on the right side. It has been nicely done as there was no hint of it before. This is why the decal on the right looked untouched as it was re-applied on new paint. They obviously blew the whole tank over with Rosso without prepping the left hand decal and just re-applied one over the raised original. I thought the left side would have a dent. I do have a dent of my own to fill on the left though!

I've also prepped the filler cap. The outer ring will be polished and I've cleaned the ribbed inner ring up with a little Dremel wire brush. I hoped it would polish it up and retain the ribs, but the finish is not even, although it is clean. I've tried Autosol with the wire brush, but no improvement. I figured that a bare polished finish could not be affected by petrol, but I may have to resort back to paint on the inner ring.
I'm trying to think of something different to Silver, but stumped as to what.
Gold would be out as it would be too similar, but not the same as the cap. Red would look horrid. I might try some metallic grey I have that I used on the dash, it was a good match for the original on that, but not sure on my ring. Looking for suggestions, including how I can polish the ribs.


Incidentally, I put the ring on my turntable at 45rpm and it played the intro to Breathe from Dark Side of the Moon. How cool is that?
 
Mine plays Have a Cigar, go figure. I have a nice gold keyless cap if you're interested, I think it might be the rare Comfortably Numb version? :)
 
Thanks for all the info DD. It has pulled it all into focus.


I did get all the paint off one of my tanks though. I bought some paint stripper from Screwfix and might as well have put yoghurt on the tank!!
Dacs' strong stuff was much better.
In the end I finished it with 80grit and wire brushes which was quicker and cleaner altogether than paint stripper.
So that's how the other tank will be stripped.

I've a flywheel from a 2-stroke needing paint removed. Not really suited to abrade as access is difficult in and around all the fins. What is this Dacs strong stuff you refer? Would you happen to have a link? Ta muchy
 
The stuff you can try dunf is from Frost Automotive https://www.frost.co.uk/frost-strip-gel-500ml/
The preferred method years ago, if it was small enough, was to chuck it in a bucket of thinners or Acetone. Not so cheap to fill a bucket these days though!
The Frosty stuff is better than yogurt, but you'll still need to be patient and expect to need at least two applications.

Thanks Darren. I think I'll stick with my trusty old cap, but the thought of my bike singing HELLO to me as I went to mount is very appealing.
Anyone got a version that plays the intro to Start Me Up, or any other super cool Stones into? (I love them all. :D)
 
After hearing about the musical petrol caps, and seeing that as the tank is off being painted, I gave mine a quick spin ....

I've got "Here we go again on my own" by Whitesnake .... :biggrin:

It could've been worse - I've heard there's quite a few Joe Dolce petrol caps out there :thumbsdown:
 
Last edited:
I use P4 calipers on The Heap, they do work well but I'm not sure how much better they are compared to the original goldline calipers. Maybe if I was racing, but with more sedate road riding it's hard to compare. Oh yes I did have to change the handlebar master cylinders too. The coffin resevoir type just weren't up to the job. Mine were off a 749 with integral reservoirs to avoid the Meccano type resevoirs.
 
Last edited:
Good find dunf, you can always grow new skin and eyeballs. :mand:

Teensy bit of progress this evening. I tried some stainless wire wool. left over from exhaust packing, on the fuel cap ribbed ring. It's brightened it up a lot more and evened the colour up, so this could be the way forward. I like stainless for this better than steel wool as it doesn't leave lots of little bits everywhere that go brown!


Also tried an idea on the broken zip pull tag on my Mandarina Ducks. This definitely has legs and I'll try and do this on my jacket too. I know it does let a cat out of the bag, but there will soon be some news.

 
Progress is slow with the little nibbles I take at it when I can. I think we're in for a long haul! I keep finding little extra jobs I want to do.
I've got the filler cap where I want it now. I polished the outer ring and it's got enough twinkle now. The gold on the lid is a little marked, but it's way too daunting to think about taking it apart to re-paint it. All those fiddly little springs and pins!
It will get Ti screws when I get some money.


The two tanks are just about ready for primer, with all the filling now done. It remains to be seen if I have enough air to do a decent job, might have to rig another tank.

A job I can do without spending anything is to sort the centre stand, so I got down and dirty with it.
I removed the rear brake torque arm and "S" special under mudguard extension.
Noting the spacers, I removed the bottom footrest hanger bolts both sides and the torque rod bracket. I worked out the spacers needed to fit with the centre stand and managed to find some the correct thickness. The stand has already been fitted to my SS when it underwent some fettling so I'm pretty deft at getting it on and off. Left hand bracket goes on first and is bolted up tight-ish. The insert that takes the bolt for the breather hose guide has to come out of the right hand side. Loosen the bolt, give it a tap inwards and then jiggle it out with the insert on the bolt. It's a kind of expanding rawlbolt type of thing.
The right hand bracket remains assembled onto the stand complete with spring and then feeds onto the left hand pivot and into place on the right side. It's fun jiggling all the bolts into place, but not too difficult with patience. A long bolt goes right through the rear of the crankcases and stand brackets.
I need a couple of easy mods. The assistor arm hits the left silencer, but not by much. I need to move it outwards by 15mm to clear it. Clearance from the back tyre is tight and I'll grind out the stand crossbar/brace and weld a plate back in to give some more comfortable room there, so I can fit a new tyre or chain and still have some room.

I had hoped to keep the "S" under guard but there's not enough room for that, so I've abbreviated the original in order to keep what of it I can and maybe protect the stand a bit, it will also keep the thread holes for the mounting screws nice and clean if I have screws in them. Don't worry I have a brand new intact one in the cupboard.


I tried to keep the long leg on the left to help keep chain goo off the tyre, but had to cut it off after a try fit anyway.

It's easy to get the bike on and off the stand so I'm well pleased with it so far. I could never understand why centre stands went out of fashion. Is it just Ducati or have they all stopped fitting them? Used to be that the side stand was the extra and the centre stand was standard and essential equipment.
I'm looking forward to parking the bike in the workshop and taking much less room than on the lean. Also good for lubing the chain in the field and wheel removal should it be needed in an emergency. I should be able to get more petrol in the tank too if I fill it level on the stand. (It'll never catch on! :chuckle:)
 
Last edited:
Got a centre stand thats going on my 900 - ok weighs a bit more but saves so much aggro when cleaning and oiling the chain etc that its worth it imho
 
The tanks still sit on the bench waiting for primer. I have to figure out a way to make a polyethene tent in the workshop and still be able to get at everything.


upload image

The 4 pad calipers are try fitted to the forks and look good without being too different to the original Goldlines. The pistons are a little bigger and all the same size rather than two big and two smaller ones. Each piston has it's own little pad. Not as sexy as the radial ones I had, but should be just as effective and retain the original "S" forks.
The speedo cable route seems to be compromised by these though, like the radials did.
But luckily I have the XS650 one and it solves the problem. The original cable and Goldlines were not brilliant so it seems. There is a witness on the left caliper where it rubbed and the cable has taken a set in a strange "S" curve where the caliper pushed it out of line. Not ideal from new!

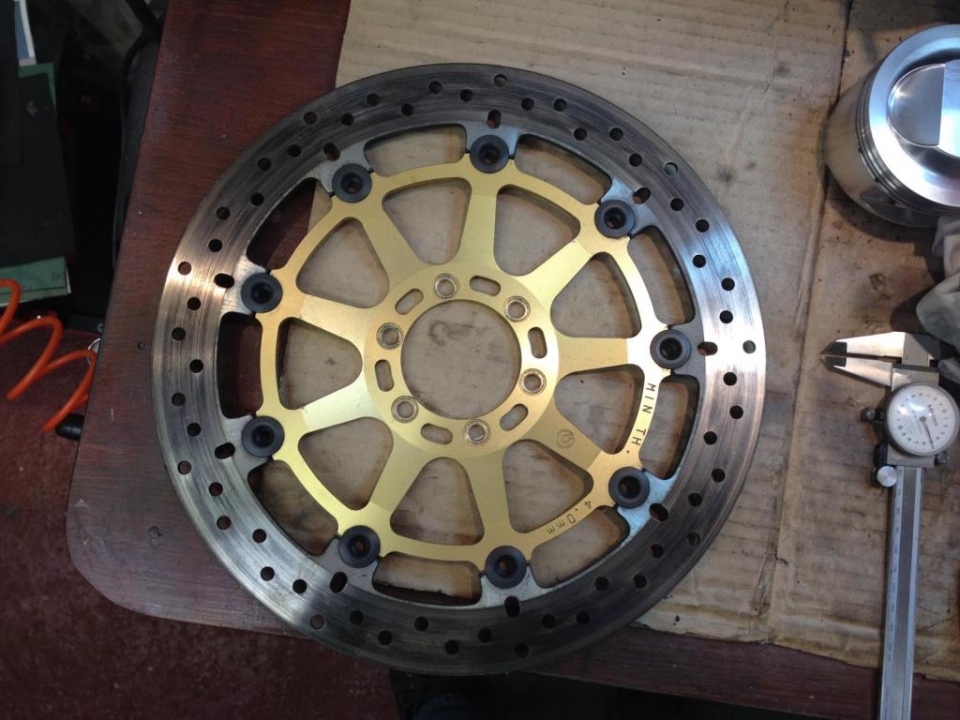
Studying the speedo gearbox when I rotate the wheel revealed that the Ti disc bolts do actually touch it. It was serendipitous that I fitted button head bolts when I got the Arashi discs, because they cleared everything nicely, but standard height bolts would have fouled it as the disc carrier is thicker than the Brembos.
I've now got new discs as the Arashis are below 4mm thick now. I couldn't find Arashi replacements in the UK and have been caught with duty from China before, so sourced Rezo discs which seem to be identical in every way to the Arashis except for price and also that they have counterbored bolt holes which is again serendipitous as it means I can use my Ti bolts without fouling the dratted speedo gearbox.. Getting there!

I started to draw up a list of bolt sizes for Ti replacements and looking at the cap screws with the clumsily broached Allen heads and raised letters, I realised that the teenzy letters were A2-70. So I got to work tidying the heads up with my standard format.

Best way to hold the screws is in a drill chuck.
Then I present them to my sanding disc with the drill turning. This gives a nice even grind very quickly. About 1.5 seconds actually.


upload pic

Obviously it's a bit scratchy straight off the sander, but flat..


Repeat this on a stitched mop with Blue soap for few more seconds and it saves buying new screws. https://metalpolishingsupplies.co.u...BrbrzqxjmKp30SCfB_gSubm_nclIYE3BoClxYQAvD_BwE


Ready to go now and very long itch scratched.


Finished my Ti shopping list and sent an order off to RaceTi https://www.raceti.com/
Also ordered a pair of BT023 from M&P to go on the wheels when they are re-lacquered.
I've drained the brake fluid and will measure the lines for the 4 pads and order more Hel lines from Motorcycle Products. This is the best deal I've seen for custom Hel lines. https://www.motorcycleproducts.co.uk/hel-custom-braided-brake-lines/1/023803
That will be the budget just about gone for the time being, till the next payday.

I've ground out the centre stand and made a patch to weld on. Also fitted a small tube in the top to be welded.
This is to guarantee that the legs don't fold inwards off the pivots due to any weakness caused by my grinding. I remember reading about BMW stands failing and locking the back wheels back in the 70's. There were a few fatalities as I remember, including at least one police rider.. Sticks in ones mind!

 
Last edited:
Back
Top