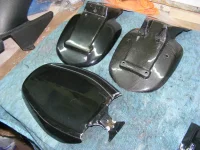
rsrmoto_monster-titanium

Monster 900Sie 50000mile refresh.

On goes 2.6kg.

Almost forgot that I found some stainless roll pins that are the exact size of the retaining pins for the airbox lid clips, so I swapped the rusty ones out for rustless ones.
Also discovered that one wasn't the proper pin at all, but a piece of brass rod that was too small and dropped out. I suspect this is the work of Harrison when he last serviced the valves. unbeknown to him, the last work he will do for me!

My proudest achievement so far is to finally, after so many years, fit the centre stand.
It's been a bit of a battle and I had to get rid of the floating rear brake and part of the Sie extended lower mudguard.
First job was to grind out the cross brace to give the tyre more room. I re-plated this for strength and added a small extra brace close to the pivots as a precaution. (See post #80)
My cousin has a really good chap at his vehicle repair garage who is ace with the company MIG and he did a great job of the welding.
He did forget to move the assistor arm out by 15mm as I asked, but I forgave him.
I got it hot enough to bend at home with a large propane torch I have. but each little bend revealed the need for another in a different place. Long story short it ended up looking like a sad liquorice twist and had compromised the ground clearance unacceptably, so I cut it off.
I figured that a straight arm ending just in front of the silencer would put the foot pedal exactly where I wanted it and be completely out of the way.
I found a piece of tube and splatted it on with my stick welder, but it made it impossible to get the bike on the stand at all. A study of the geometry made it obvious what I had done wrong and how it needed to be to work.
I found a great place in Cumbria who will put a bend of any angle in a 300mm piece of tube, with various diameters available. https://www.vpengineering.net/
So I made a cardboard template to ascertain the angle and ordered up for less than a tenner.
With the actual tube in hand it soon became obvious that I'd got it wrong, but I'm learning and it's now much easier to see what I need to do.
So after another cardboard pattern I made another order with a 27degree bend and this was much more successful. I tacked this with my stick welder and let the good guy finish it properly.


It now comes up just behind the chamfer of the silencer and I don't think I'll be getting down that far with my riding style at my age!
The action to get it on the stand is so easy now. A revelation.
The trick is to get the end of the arm as close to the ground as possible when the stand is down.


You can see the arm through the stand, about 5mm from the ground.

Whilst playing with the stand it occurred to me that I could possibly contrive a way to lock it down and I came up with two brackets that align when the stand is down. Kindly welded on for me again by my new mate.
It will lock down with any disc lock, but I bought an alarm lock for the purpose.


That'll give the thieving scrotes something to think about while I load and aim!!

I'm really pleased with my work and consider it 2.6kg well worth carrying. The disc lock is nearly another half kilo too, but well worth it if I get to keep my bike.

As it happens I have another ST2 stand which I intend to modify in the same way for a Monster.. So if anyone's interested.. :thumbsup:
 
Last edited:
I'll definitely be up for some screws when you're ready but no rush! I also have the centre stand kit to fit to my 900 when I get all my wheels etc powder coated and return from Normandy next month. I won't go for the lock option though as I'm highly likely to forget and try to ride off.

Finally are you seeking the rear brake?
 
Well I'd be interested in seeing you try to ride off with the centre stand down.. :chuckle:
Possibly the only thing funnier was the guy who toppled over in front of me at a roundabout many years ago.
I went help him up and he said he'd forgotten to put his feet down as he'd only just taken the chair off.

Screws no problem, whenever you send me your address. Shame the postage is so much for those tiny bits!

Yes I've got all the brake bits already thanks, Bracket, pads, hose, Ti bolts, a new disc and of course the original caliper.
I'm hoping that will save a few grams over the floating set up as I'm concentrating on paring the unsprung weight down wherever practical/affordable.
I don't see the point in trying to claw back the 3 ish kilos the centre stand has put on since I always ride with pannier full of stuff anyway.
I'll be interested to hear how your centre stand kit fits. I highly recommend a dry fit first.
 
Currently I've got a built bike sat on a stand with the rear end complete and the yokes fitted at the front with my focus at moment being getting the wiring joined up.

Need wheels, tyres and some other misc parts coating next and then fitting before I can try the stand kit.

Time and money - never have enough of both! But I'd be interested in the rear brake minus the caliper and hose as I've got all those bits already.
 
Ah! Sorry to be mean, but I'm hanging on to all the original Sie stuff including a new un-cut mudguard extension.
I did compile a list of part numbers to make a floating brake kit for Craig and Luke at Moto Rapido, hopefully they still have it on file.

For what it's worth I persevered with the floating brake for 11 years and many thousands of miles, while diligently keeping on top of maintenance, it has proved to be a very wear prone set up regarding rose joints, floating axle bushes, discs and pads.
Apart from that it works well when in good order. You can brake hard with no pitch change or wheel hop.

To be honest I think the centre stand trumps the floating brake in terms of usefulness and besides you can't have both btw, the torque rod clashes with the stand.
 
No worries I've got the parts list ready but from memory it's about 300 notes all in so not urgent. I did contact Redfox but whilst they sell them they didn't have any stock or could tell me when more would be manufactured.
 
Sorry to say that this project has pretty much stalled due to having so many things to do!
I'm hoping I can get back to it soon, otherwise it will be a totally Monster-less Summer. The longest lay-up since I've owned it.

The last thing I did was dismantle the Mandarina Duck panniers and scrub them within an inch of their lives. They came up quite well considering the all year use they get.


They had become a bit unpicked and frayed in places, so I dug out my Dad's Palm and needle to do some heavy duty stitching.


He used it for repairing sails and anything else with really thick material. it's basically a thimble but you push the rather large needle through the material with your palm, engaging the eye in the very hard dimpled pad. I always pull a face when I'm pushing as slipping would be unthinkably horrendous! But it never has.

I swapped out the broken zip pulls for UKMOC keyrings and set about remaking the handles.
They only had one between them when I bought them and that was held on with a cable tie.

I machined up a couple of lengths of Indian Rosewood that I had squandered away for a very long time.


https://imgbb.com/

Bejesus it's hard stuff! I managed to shape a couple of handles replicating the original plastic one as closely as possible.


I couldn't help making the connection between Indian rosewood and guitar finger boards, as it happened I had some pearl dots left over from a recent guitar restoration. So I couldn't resist the temptation to add a couple to the handles to make them a little bit special.


A few coats of sprayed lacquer brought them up quite nicely and I like them a lot.

I've just got to replace the temporary steel crosshead screws with some ludicrously expensive slotted stainless ones and the job is complete to my satisfaction.

Well worth the effort as these are the way best of my extensive pannier collection and apparently unobtainable now, and I have been looking.
 
Last edited:
Another little bit of progress of sorts has been to acquire Kato's old compressor.
Sadly the couriers threw it off a lorry or some such and quite extensively damaged it.
This was UPS by the way.
The basteds wouldn't even pay any compensation despite Kato making a full account of the damage with evidence supplied by myself.
That's UPS by the way. UPS.

Even before they (UPS) had refused to stump up for their negligence, I had cunningly repaired all the smashed parts and gotten it coupled up to my original compressor to make a much better set up with a total of 100ltrs of tankage and Kato's super powerful V-twin pump.
I've renovated my old regulator/moisture trap and mounted that into the system too, so all should be good to spray all the bits.. But when??

 
Last edited:
Wow, love those wood handles, beautifully done :) and great to see these paniers repaired and brought back to life…
 
Just had a little trip down the road to see local upholstery magus Clive The Seat.

I'm very pleased with what he's done with the material I've had stashed away for years to do this job.

Hump is Alacantara and the seat pad is from the original seat, retained as it matches the Mandarina Duck panniers.

Photo doesn't do it justice. I'm hoping this will spur on the project.

 
Well there's hope for riding my Monster again one day.
I found some time to do a little spraying and I've managed to get the carriers on the new Rezo discs painted BMW Solid Gold, which is a match for the "Brembo" Gold that was on the original disc carriers.


I used my new mini spray gun for this and it was just the job until I got to the clear lacquer, when it would just not deliver quick enough, so I had to flat it off and get an old favourite out which did put the clear on at a much better rate, so it could float out properly.

I've also got a coat of primer on the tanks at long last!


I had far more primer mixed up from doing the discs than I was prepared to throw away, so I set about one of the tanks with the mini gun, but it was so slow and the coat was thin and dried rough!
I've now mixed some more and it's gone on the other tank like a dream with my bigger gun. So just a matter of choosing the right tool for the job.

The weather has been perfect the last couple of days, for spraying outside, which is just as well since I still can't figure out how to curtain my workshop out with polythene to do it inside.
Doing it just inside the open door with a small fan at the back of the workshop seems to work too, so maybe that's the way forward?
Kato's old compressor coupled to mine seems to be working well too. I turn them both on for the initial fill, which is very rapid, but then I switch mine off and let the bigger V-twin take care of top ups.

I'm hoping I can manage to get some Rosso on at home and maybe the first clearcoat before decals and stripes, but I think they will have to go to Oakham for the final clearcoat in my mates proper spray booth.

The spare tank will be for sale when it's done in Rosso with standard Silver decals. (In the right place too. :D)
 
Progress is still slow as so many other things get in the way of working on my Monster, but.
There has been a little tangible progress. I've been snatching to opportunity to get paint on when the weather has been suitable to do this outside.
I found I was still going through to metal after rubbing the second coat of primer down with 1200, so I've resorted to my old trick of putting a bit of base coat in the 2K primer to distinguish it from the lower layer and act as a depth gauge.
I slipped a bit with the red and a bit more went in than intended, but I really like the result. So much nicer than looking at grey tanks for so long!


Note Buzzer; Orange is not the only colour. :banana:

Also commissioned some masks for the tank lettering, which I will spray on.
I worked with this company earlier this year to produce some stained glass designs in translucent film which a specialist glazing company then made into sealed units.
We pushed the boundaries together and achieved a stunning result using techniques not used for this before. It was quite flattering the way they all welcomed me when I stepped in... I wonder if I'll get my masks a bit cheaper? :scratch:
 
It's hard to believe that I've done so little to the Monster since September!
I retired in September and I thought that would mean I had more time for hobbies, but...

I did make the most of the nice weather and got base coat and clearcoat on both tanks, but it didn't go well and I ran out of good weather for getting any more paint on. The tanks now sit rubbed back to primer and ready to start all over again!
The plan is to take them over to my mate at Oakham and get them done properly in his spray booth.

I've been trying to hit it hard over the holidays
The Carbon is nearly all prepped for the trip now.
It's taken a battering over the years and I only really did a rush job in the first place when I first got the bike in 2013. It was all a bit shabby and brown then. I spent ages cleaning it and then layering on lacquer until all the pinholes were filled up. I had the use of the work spray shop for one evening so got everything ready for the top coat and made an early start on a late summer's eve. I was reluctant to use the extraction fans as a neighbour was doing his best to get us closed down and the quite noisy fans were part of his beef.
I stood my bits by the large roller shutter door and sprayed towards the opening. There were seeds floating on the evening breeze and many insects at large!
It hadn't gone too badly and I was keen to get home and crack a bottle open, so I rolled the door shut, only for a cascade of detritus to avalanche from the top of the rollers!. I cut it back as best I could and it had to do for about ten years.
One thing about clear lacquer over carbon is that you can get away with murder, but I was finding myriad imperfections when I flatted it back. I think we're nearly there now though.
Next job will be to get the wheels off, then the tyres, and prep the clear coat on those ready for the big trip.

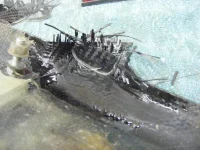
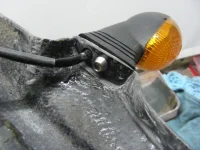
The Tea-tray needed a repair to the LH winker mounting area. This has taken some hard knocks over the years and had some previous repairs.
The ally reinforcement I tried didn't really work so I cleaned it all up and laid some carbon and epoxy in and clamped it between two bits of shaped nylon sheet, this worked a treat, giving a nice even consolidated job with a smooth finish on the inside.

DSCF9689.webp

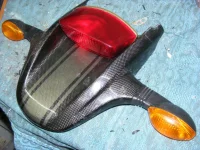
With the whiskers cut off and the holes drilled back through, I try fitted the brand new winkers I bought from Bitza. (Complete with bulbs and what look like Ti screws!)

DSCF9693.webp

DSCF9692.webp
I couldn't resist just trying the tail light in after fitting a new lens with new stainless screws and having sprayed in the rear of the holder in Gold. (You should know me by now.:p)
 
DSCF9696.webp

The number plate holder seems pretty good and I'll get away with compounding and waxing that.
I've tried in the mini LED number plate lights which are a fraction the weight of the original light. I haven't used that for years, but instead have stuck LED strips to the underside of the Tea-tray. This works okay but they are not very durable, being the 1st gen LED strips with no heat sink, so I've replaced them a few times and I've run out now. A new number plate is ordered which will be attached with sticky pads, the plastic bolt heads always got on my nerves as the don't register with the numbers properly.
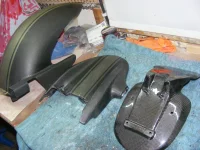
Hugger and Tea-tray looking good in 1200g finish. Mudguard and side panels out of view in this shot, but same 1200g finish

DSCF9698.webp

I've been working on some moulds for a Tea-tray and plate holder for my other bike, which has gone through several design changes.
I'm happy with the shape and fit in GRP now, so I'm ready to take some carbon ones out of the moulds.
Once I've trimmed the first mouldings, I push them back into the mould and scratch a line round them, which them makes a nice trim line for subsequent mouldings.
No prizes for guessing what was the donor for the number plate holder, but I've altered it quite radically to suit the new application.
I just need to pluck up the courage to commit to Carbon! Lots of experience with GRP but I'm a Carbon newb!
I'm also working on a proper hugger for that bike as the thing they provide these days is about as much good as a thong!!
 
The stock blinkers are long and quite heavy, so they'll bend, shake and break the tray again. One easy way of maybe avoiding it, is to mount the stock blinker steel plate, behind the carbon. Have them?
 
The stock blinkers are long and quite heavy, so they'll bend, shake and break the tray again. One easy way of maybe avoiding it, is to mount the stock blinker steel plate, behind the carbon. Have them?
Only the left hand side broke. It was across the very thin material by the harness hole. It was still well attached but clicked when I nudged it.
It now has an extra 4 layers of 210gm carbon twill pressed in and it's more than double as strong as before. I did both sides while there.
I think the blows that the winker took would have broken a steel bracket and probably the winker if the steel didn't give!
I'll stick to the lightweight repair. I've got 2.6 kilos to save after fitting the centre stand! 🤪
 
I'm managing to keep up the pace with the refresh now, with at least a couple of hours on it each day.
I'm just about ready for a trip to Oakham with all the carbon for re-lacquering and the two fuel tanks.

I've popped the wheels out, taken all the discs off and the tyres. The intention was to re-lacquer those too, but I've had a change of mind having made a close inspection today. I think I will just remove the damaged lacquer from the polished flanges, re-polish and run them bare to see how it goes.
The lacquer doesn't adhere particularly well to polished metal and chips with amazing ease, so I think naked is the way forward as I don't mind the occasional polish up anyway.
The paint and clearcoat I put on 12 years ago is still good and will come up okay with a couple of touch ups, compound and wax.

Alarmingly I have found that neither of the front wheel bearings will rotate! So since bearings are quite cheap I think it's a good excuse for a change.
I changed the RH one 12 years ago when I discovered a damaged seal.

Help please.
Looking at the LH one with the speedo drive dog, I can't see how the dog and retaining ring is, er, retained. I'm assuming that the whole lot will drift out with the bearing? I can't see a circlip or snap ring. The factory manual is not much help unfortunately, except for not showing any circlips in the tiny exploded drawing.
Could anyone advise please before I go mad with a big hammer?
Also could anyone remind me that the bearings should be C3 tolerance? Hopefully it will be stamped on the old ones.

Thanks in advance.
 
A closer inspection reveals that the ring is in fact a seal and looks like it can only drift out with the bearing.
Referring to parts diagrams seems to confirm this with no clips in the assy. So I'll be getting busy with the big hammers and drifts tomorrow.

I would still be grateful if anyone could confirm the bearing clearance spec please. I'm sure they should be C3?
I’m pretty sure they’re all C3 spec. At least my 2004 monster 1000 is definitely C3.
 
Back
Top