UK Monster Owners Club Forum » .: Technical :. » Mods & How To's » Ducati Monster 900 rebuild

Reply
 
Thread Tools Display Modes
Old 15-12-2020, 05:48 PM   #76
buzzer
Registered User
 
buzzer's Avatar
 
Join Date: Jun 2018
Location: Wolverhampton
Bike: M900
Posts: 392
thanks guys, I will get some oil...

my wife will often say I am definitely on the spectrum... today I fitted the side stand and noticed there was more play than I liked... so I made a new bush, and bronze thrust washer as I knew it would niggle me if I didn't!

buzzer is offline   Reply With Quote
Old 15-12-2020, 06:20 PM   #77
350TSS
Too much time on my hands member
 
350TSS's Avatar
 
Join Date: Jan 2013
Location: Shipbourne
Bike: M900
Posts: 1,420
Nice job, presumably you had to hacksaw/dremel out the old one? I have the same problem with my side stand, what dimensions did you machine the bush to? And, was the wear in the bush or on the post?
350TSS is offline   Reply With Quote
Old 15-12-2020, 09:03 PM   #78
Darren69
Transmaniacon MOC
 
Darren69's Avatar
 
Join Date: Sep 2013
Location: Sutton In Ashfield
Bike: Multiple Monsters
Posts: 6,026
Ask Albie, but I'm not convinced by that powdercoating frame job, it just looks brown to me.
__________________
Roast Beef Monster!

Termignoni and Bucci - Italian for pipe and slippers!

S4 Fogarty, S4R 07T, 748, Series 1 Mirage
Darren69 is offline   Reply With Quote
Old 15-12-2020, 09:34 PM   #79
Darkness
.
 
Darkness's Avatar
 
Join Date: May 2007
Location: Stockbridge
Bike: M900
Posts: 1,984
Quote:
Originally Posted by Darren69 View Post
Ask Albie, but I'm not convinced by that powdercoating frame job, it just looks brown to me.
Albie has been seeking ‘93 and ‘94 bronze paint, which is quite different.

Ian Falloon notes in the Monster Bible that for the ‘95 and ‘96 model years the frames were painted the same “Gold” as the 916, and notes further changes for ‘96 model year (Changes to the frame brackets for vacuum fuel tap, choke pull on handlebars, adjustable Marzocchi forks and 20mm front axle).

https://books.google.co.uk/books?id=...page&q&f=false

By 2000 the frame colour had changed again to another bronze/gold shade.
__________________
Original and Best since 1993
Darkness is offline   Reply With Quote
Old 16-12-2020, 12:15 AM   #80
Albie
Fanactical volunteer
 
Albie's Avatar
 
Join Date: Oct 2003
Location: Kent
Bike: M900
Posts: 9,033
Quote:
Originally Posted by Darkness View Post
Albie has been seeking ‘93 and ‘94 bronze paint, which is quite different.

Ian Falloon notes in the Monster Bible that for the ‘95 and ‘96 model years the frames were painted the same “Gold” as the 916, and notes further changes for ‘96 model year (Changes to the frame brackets for vacuum fuel tap, choke pull on handlebars, adjustable Marzocchi forks and 20mm front axle).

https://books.google.co.uk/books?id=...page&q&f=false

By 2000 the frame colour had changed again to another bronze/gold shade.
It if it were done at Redditch where I got mine done and badly advised by someone its bsa gold which is close to 97 but it appears to have gloss lacquer not satin. That's why I did mine again and why my faults came to light after it shrunk back. As we all know any gold is a problem. Silver and grey and black not so much until you get to darks or 1100s where it has Metallic in the paint. Just leave it and know it looks great and good restoration not factory resto.
Albie is offline   Reply With Quote
Old 16-12-2020, 07:47 AM   #81
buzzer
Registered User
 
buzzer's Avatar
 
Join Date: Jun 2018
Location: Wolverhampton
Bike: M900
Posts: 392
Quote:
Originally Posted by Albie View Post
It if it were done at Redditch where I got mine done and badly advised by someone its bsa gold which is close to 97 but it appears to have gloss lacquer not satin. That's why I did mine again and why my faults came to light after it shrunk back. As we all know any gold is a problem. Silver and grey and black not so much until you get to darks or 1100s where it has Metallic in the paint. Just leave it and know it looks great and good restoration not factory resto.
it was done at Redditch... but I asked for gloss as I don't like the satin/matt look on the original... the gold they do is pretty close to be honest if its done Matt...

I did the bike below a couple of years ago for a mate... it was pretty mint already apart from some acid stains on the frame... I went to my local paint shop and asked them to match it... they got it very close, but gave me some tint, and matting agent to do the final match myself. by a bit of trial and error, I got it spot on and touched it in with an air brush... you simply could not tell when it was done, my mate was over the moon... So it can be matched. I am not too precious about getting exact matches... back in the 80's I used to do some paintwork for Slaters... it was interesting that you could have several bikes in the showroom, all original, all different shades of reds, greens and orange! The orange was the worst... you still get the Laverda guys stressing about getting the "original" Jota orange!


buzzer is offline   Reply With Quote
Old 16-12-2020, 07:52 AM   #82
buzzer
Registered User
 
buzzer's Avatar
 
Join Date: Jun 2018
Location: Wolverhampton
Bike: M900
Posts: 392
Quote:
Originally Posted by 350TSS View Post
Nice job, presumably you had to hacksaw/dremel out the old one? I have the same problem with my side stand, what dimensions did you machine the bush to? And, was the wear in the bush or on the post?
I just pressed it out in the vice, and pressed a new one in... Actually I didn't "make" it... I had some sized split bushes in stock that had been in a box from when I had a Lancia in the 80's. it was the perfect size. I had two...

I have sent you a PM...
buzzer is offline   Reply With Quote
Old 18-12-2020, 10:00 AM   #83
buzzer
Registered User
 
buzzer's Avatar
 
Join Date: Jun 2018
Location: Wolverhampton
Bike: M900
Posts: 392
Its funny how to me progress seems slow, but when you come to put it all together you realise that all the little jobs you have been doing over the months are now paying off as it becomes an assembly job! One thing I have done in the last few days is to check the loom over… its in great condition apart from one area… It looks like someone has fitted an alarm at some point…, and someone has subsequently removed it! they didn’t do a bad repair, but I hate the tape over bare wires, and I wanted to check the integrity of the joints, so I pulled the soldered wires apart and re-soldered them, and covered the join with shrink wrap. To finish it off nicely I took the terminals out of the blocks with my terminal removal tool. this is a fantastic little set of tools, and very cheap to buy.. I have lost count of the times I have used them over the years! that meant I could use some braided expandable sheathing which most cars seem to use these days. it means it can go over the terminals and then fit tight on the wires. this is finished off with some hear shrink, and if you use the glue lined stuff it makes a good repair.

probably my last update this side of the holiday... Merry Christmas!


buzzer is offline   Reply With Quote
Old 18-12-2020, 01:12 PM   #84
SteveG
Registered User
 
SteveG's Avatar
 
Join Date: Jan 2014
Location: Newbury
Bike: Multiple Monsters
Posts: 366
That is stunning...
SteveG is offline   Reply With Quote
Old 18-12-2020, 01:57 PM   #85
Darren69
Transmaniacon MOC
 
Darren69's Avatar
 
Join Date: Sep 2013
Location: Sutton In Ashfield
Bike: Multiple Monsters
Posts: 6,026
I think with this build you could actually pull off the shiny frame paint with the polished engine. It looks really good to me!
__________________
Roast Beef Monster!

Termignoni and Bucci - Italian for pipe and slippers!

S4 Fogarty, S4R 07T, 748, Series 1 Mirage
Darren69 is offline   Reply With Quote
Old 18-12-2020, 02:28 PM   #86
slob
.
 
slob's Avatar
 
Join Date: Jul 2003
Location: East London
Bike: Multiple Monsters
Posts: 9,713
I think the browness is an illusion caused by digital cameras, lighting and computer screens, in *some* of the photos it looks exactly the right colour, just not matt. RAL1036??
slob is offline   Reply With Quote
Old 18-12-2020, 02:38 PM   #87
buzzer
Registered User
 
buzzer's Avatar
 
Join Date: Jun 2018
Location: Wolverhampton
Bike: M900
Posts: 392
Quote:
Originally Posted by slob View Post
I think the browness is an illusion caused by digital cameras, lighting and computer screens, in *some* of the photos it looks exactly the right colour, just not matt. RAL1036??

I agree, its difficult to get consistent pictures with the lighting as it is in the garage... plus they are all taken on a phone rather than a camera... I do like the way the frame has come out though...
buzzer is offline   Reply With Quote
Old 18-12-2020, 06:29 PM   #88
Albie
Fanactical volunteer
 
Albie's Avatar
 
Join Date: Oct 2003
Location: Kent
Bike: M900
Posts: 9,033
Quote:
Originally Posted by buzzer View Post
I agree, its difficult to get consistent pictures with the lighting as it is in the garage... plus they are all taken on a phone rather than a camera... I do like the way the frame has come out though...
It doesnt photograph well. These were from my original Redditch colour and some pics it looked green tone. Some were fine as a colour but not 93/94. This was the satin lacquer coat.


[URL=http://s1042.photobucket.com/user/ukmonster/media/Monster%20900/20150901_214850.jpg.html][IMG]http:/
Albie is offline   Reply With Quote
Old 26-12-2020, 11:17 AM   #89
buzzer
Registered User
 
buzzer's Avatar
 
Join Date: Jun 2018
Location: Wolverhampton
Bike: M900
Posts: 392
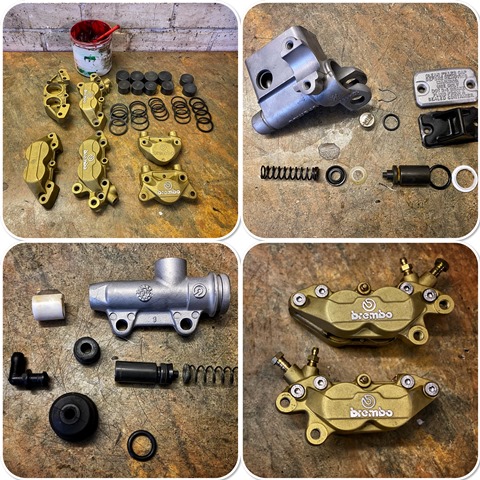
back after the break... I did relent and have a few hours in the workshop! next the hydraulics … I stripped everything down and cleaned the callipers and master cylinder up. the callipers came up well, but the anodizing on the master cylinders were poor… so I bead blasted them and have decided to leave them silver… All the seals were perfect, so I have reused these. I cleaned the callipers up in petrol with some very fine scotchbrite, being very gentle, they came up a treat.

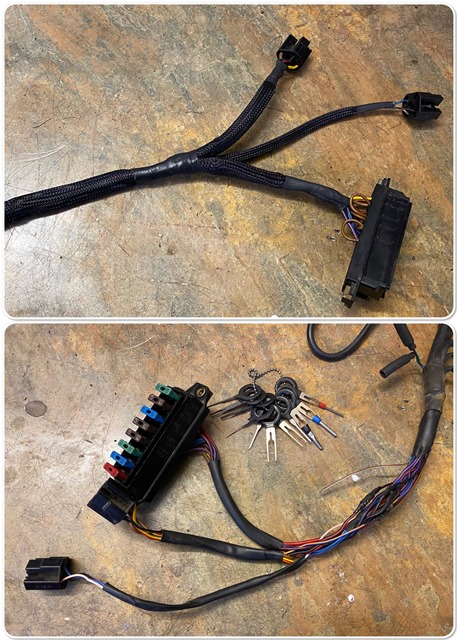
looked at the switchgear and although its in great condition, the plastic sleeving was tatty… so I used some of the braided stuff, and some glue lined shrink wrap to finish it off… the braided stuff expands a lot, so no need to remove the terminals off the wire which is a bonus.


buzzer is offline   Reply With Quote
Old 29-12-2020, 01:34 PM   #90
buzzer
Registered User
 
buzzer's Avatar
 
Join Date: Jun 2018
Location: Wolverhampton
Bike: M900
Posts: 392
starting to go back together, I am pleased with the way the exhaust and silencers polished up… Polishing always hurts my wrists these days… must be getting old ��

buzzer is offline   Reply With Quote
Reply


Posting Rules
You may not post new threads
You may not post replies
You may not post attachments
You may not edit your posts

BB code is On
Smilies are On
[IMG] code is On
HTML code is Off

Forum Jump


All times are GMT. The time now is 09:21 AM.

vBulletin Skins by vBmode.com. Powered by vBulletin® Version 3.8.3
Copyright ©2000 - 2024, Jelsoft Enterprises Ltd.