UK Monster Owners Club Forum » .: Technical :. » Mods & How To's » Seized Bolt Anyone?!

Reply
 
Thread Tools Display Modes
Old 20-03-2024, 04:51 PM   #16
Dukedesmo
Registered User
 
Dukedesmo's Avatar
 
Join Date: Sep 2010
Location: Leics
Bike: M900
Posts: 2,842
I'm currently restoring an old Land Rover and, as such have experienced pretty much every type of seized bolt available, most of which I have just cut out because there's no real alternative and I'll be replacing them anyway.

But a few, where they are in 'sensitive' areas such as aluminium of gearbox housing etc. have required a little more of a sophisticated approach and I've resorted to drilling or drilling then slitting through the bolt, to welding a nut on to a stud or broken bolt, giving something to grip on but, also getting some serious heat into the thing that can help release it and this seems to (mostly) work reasonably well as the weld won't stick to the ally but will heat it up quickly which can help break the bond.

Not sure exactly how the sie swingarm is? but maybe, access depending, you can weld an allen key (ideally one with a socket attachment on the other end) into the head of the bolt so that you can get some proper leverage on it without rounding the bolt head, the heat may then help release it?
__________________
M900, 916, LeMans II.

Dukedesmo is offline   Reply With Quote
Old 20-03-2024, 05:23 PM   #17
Martin Duke
Member
 
Join Date: Jul 2011
Location: Wells
Bike: Multiple Monsters
Posts: 110
Quote:
Originally Posted by WAH View Post
^ agree with your observations, I'm getting to stage where I'm having to ration the use of the imapact gun, it's rounding off the hex and soon the bit won't fit. Still waiting for the wizards **** to arrive (Innotec) that will be the decision point on what happens next.
The swingarm removal is going to put up a fight too, the spindle bolt adjacent to the output shaft has been mangled by the chain, judging by the scars on it I'd have to guess the chain has come off it under load.
Once again thanks for all the input, it's keeping me sane.
How about looking for some plastic tube that can be pushed over the nut - then fill the tube with your favoured penetrating fluid and leave for it to do it's stuff?
Martin Duke is offline   Reply With Quote
Old 21-03-2024, 08:47 AM   #18
WAH
Registered User
 
Join Date: Jan 2024
Location: Burnham on Crouch
Bike: Other Ducati
Posts: 24
Thanks again guys, the nut is going nowhere, it's now jammed across points in the saddle / channel washer, so much so that it has deformed the washer, the 8mm allen impact bit came from Laser, suspect being long enough to reach may also have been a weakness, in that the tool bit was probably twisting under the torque of the impact gun and not delivering the full effect.
Gave everything a good drink with the Innotec yesterday and will attempt impact gun later today.
Cheers all.
WAH is offline   Reply With Quote
Old 22-03-2024, 02:22 PM   #19
WAH
Registered User
 
Join Date: Jan 2024
Location: Burnham on Crouch
Bike: Other Ducati
Posts: 24
update, regret to advise the troublesome hex bolt is no longer a hex bolt! It took a handful of blasts from the impact gun and it rounded off to the point where the tool now just spins uselessly, bugger!
New plan B involves old mate still in the trade with a plethora of plant, so let’s see what two old plater / boilermaker heads can come up with, possibly drill the head off and drift out the remnants, a play-date is pencilled in over the Easter weekend which means Mrs WAH might actually get her list of “Man chores” addressed in the meantime.
I’ll keep you posted on any developments.
Cheers.
Edit:
Image from rear of bike, Allen access through swingarm on the right.

Last edited by WAH; 23-03-2024 at 06:14 AM..
WAH is offline   Reply With Quote
Old 22-03-2024, 03:25 PM   #20
Mr Gazza
Lord of the Rings
 
Mr Gazza's Avatar
 
Join Date: May 2013
Location: Norwich
Bike: M900sie
Posts: 5,806
I'm troubled, because it's not a hex bolt and you've showed a picture of a very slightly rounded hex NUT.
The head of the bolt is Allen and is on the left side of the bike.
You reach this with a long extension though the hole in the swinging arm.
It's the bolt that should be turned as the nut is (was?) held by it's flats in the steel channel.
This is because it's virtually impossible to get a tool onto the nut.

If I've got this completely wrong and you have indeed been turning the bolt with an Allen bit, then apologies.
In that case I think the way forward would be to remove the rear exhaust pipe and see if you can get a reciprocating saw with a metal cutting blade, underneath and make a vertical cut through the nut and the end of the bolt. It won't matter too much if you also cut the channel a bit as all three bits are replaceable.

A jigsaw might be the best tool as the builders reciprocating saws are rather long from what I've seen.
__________________
Mr Gazza is offline   Reply With Quote
Old 23-03-2024, 06:27 AM   #21
WAH
Registered User
 
Join Date: Jan 2024
Location: Burnham on Crouch
Bike: Other Ducati
Posts: 24
Apology not called for, if I managed to remove the nut the bolt will remain seized with no simple method of pulling / drifting, my thinking was taking the head off will enable drifting toward exhaust through access hole in swingarm.
Whichever method proves fruitful it's going to get ugly, spoke with local machine shop and his view is the bolt is effectively "welded" in situ given zero movement.

Last edited by WAH; 23-03-2024 at 01:24 PM..
WAH is offline   Reply With Quote
Old 23-03-2024, 07:29 AM   #22
Mr Gazza
Lord of the Rings
 
Mr Gazza's Avatar
 
Join Date: May 2013
Location: Norwich
Bike: M900sie
Posts: 5,806
Oh dear! I get the picture now.
Unfortunately if that's the case it's made worse by the fact that the bolt goes through a silent block bush in the bottom of the shock. That is to say a steel sleeve encased in rubber. Which is going to make things more complicated when it comes to drifting/turning even with the bolt head off.

You're making me feel good and bad in equal measure, as I considered buying that bike a while ago.

I think it's time for a deep breath and rolling up of the sleeves and stripping it out to remove the swinging arm along with the shock. At least it can then parade in front of various specialists.

I would be considering spark erosion at this stage.
Long ago, I met a chap who had spent about 6 times the value of a Tiger Cub, totally restoring it. He'd had to have a bolt of some sort, spark eroded out of a casing.
This literally evaporates a steel fastener out of it's surroundings without any damage to threads or anything.
No idea where you go to get this service, but worth looking.

A hydraulic press would push the bolt out once the head is off, but the jigs and tools to hold the arm and then press through the hole would be quite complicated.

Either that or find that Gynaecologist who wallpapered his hallway through the letterbox?
__________________
Mr Gazza is offline   Reply With Quote
Old 23-03-2024, 09:46 AM   #23
WAH
Registered User
 
Join Date: Jan 2024
Location: Burnham on Crouch
Bike: Other Ducati
Posts: 24
Thanks, I did have a quick google, suggests nearest spark erosion might be Peterborough.
Edit (further search revealed Witham Essex, 40mins away)
I'm going to hold off till another pair of eyes have a look and see which is the lesser of two evils, first being drill and drift or second, see if that damaged swingarm axle bolt can be coaxed out to facilitate complete removal.

Last edited by WAH; 23-03-2024 at 01:19 PM..
WAH is offline   Reply With Quote
Old 23-03-2024, 11:18 AM   #24
utopia
No turn left unstoned
 
utopia's Avatar
 
Join Date: Jun 2010
Location: leicester
Bike: M750
Posts: 4,545
Sorry, I would have responded to this earlier but I was assuming that we were dealing with the later, rod-type rear suspension here and I have no experience of that.
However, looking at your picture, that looks rather like the earlier, hoop-type suspension.
Is that the case ?
utopia is offline   Reply With Quote
Old 23-03-2024, 01:12 PM   #25
WAH
Registered User
 
Join Date: Jan 2024
Location: Burnham on Crouch
Bike: Other Ducati
Posts: 24
Hi, yes earlier hoop type, the last of that ilk.
WAH is offline   Reply With Quote
Old 24-03-2024, 03:37 PM   #26
utopia
No turn left unstoned
 
utopia's Avatar
 
Join Date: Jun 2010
Location: leicester
Bike: M750
Posts: 4,545
Ok ... in that case I understand the problem.
I have the same assembly on my bike.
Although its a 750 which had a steel swingarm as standard, I fitted an ally swingarm from an early 900 some years ago.

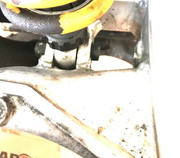
Some good news, I think .... you say the nut "is now jammed across (its) points in the channel/saddle washer".
I think this must mean that the shank of the bolt has turned slightly in the aluminium bridge pieces of the swingarm and so it follows that it isn't seized absolutely rock solid in there.
Of course it may well still be pretty tight because that's where the galvanic corrosion will have taken place between the steel bolt and the ally swingarm but it must have moved a tad so it can't be rock solid
... the solid seizing must be in the threads of the bolt and the nut.
This means that if you can remove the bolt head you should (hopefully) be able to knock out the remainder of the bolt using a suitable sized drift, as you have suggested.
I would be inclined to agree with your thinking to drill off the bolt head.

I had a closer look and a measure up.
My workshop manual says that the bolt is M10 x 1.5.
According to my tables, the root dia of those threads will be 8.16mm.
If you can drill at that dia (or preferably a tad larger) and slightly beyond any 10mm shoulder that the bolt will almost certainly have, then the bolt head should separate from the threaded portion.
Using a drill of that dia should avoid cutting into the ally, which is to be avoided at all costs
You'll need to keep the drill centralised and parallel for the same reason.
The drill should centre itself fairly well in the damaged hex socket head and the access hole in the swingarm will be a good guide to keeping the it parallel.

I measured that its 80mm from the outer face of the swingarm to the base of the bolt head, so allowing maybe 30mm of drill shank in the chuck plus a bit of clearance you'll need a drill bit at least 120mm long just to reach the base of the bolt head.
You might need a longer than std drill (the official term is "long series").

I would suggest that you aim to give it your very best shot first time.
If the drill is allowed to rub rather than cut it will only make the material tougher .. and its probably fairly tough already.
Beware of cheap drills .. I have seen some that were ground so poorly at the business end that they wouldn't cut butter. Dormer is a reliable brand and HSS (high speed steel) is the proper grade.
Don't run the drill at high speed as that will only increase its tendency to rub rather than cut. A nice (very) slow speed and a heavy feed pressure is best.
Some cutting oil would help too .. Machine mart used to sell it in litre bottles .. but somewhat counter intuitively, even engine oil is better than nothing. Maybe you know some local engineer who can give you a thimble-full. Or if you twist my arm I'll post you a small bottle.

Long series drills are expensive.
Here's an ebay listing where you'll find prices and a table of sizes / lengths.
www.ebay.co.uk/itm/153729537969
But I came across this guy who is selling a NOS Dormer HSS long series drill of 8.5mm dia for under a tenner. I reckon that's a good deal and possibly the perfect size as it should fit down the damaged 8mm hex socket without touching the sides (8mm allen key measures 9.1mm across the points so when your's spun it should have mangled the hole to about 8.5mm or more) giving you immediate purchase on the meat of the bolt as well as good centralisation of the drill.
www.ebay.co.uk/itm/126294754081

continued .......

Last edited by utopia; 24-03-2024 at 03:42 PM..
utopia is offline   Reply With Quote
Old 24-03-2024, 03:39 PM   #27
utopia
No turn left unstoned
 
utopia's Avatar
 
Join Date: Jun 2010
Location: leicester
Bike: M750
Posts: 4,545
You may want to consider drilling a smaller dia pilot hole before going in with the 8.5mm drill.
However a long series drill in a small dia might not be rigid enough.
And it might not centralise so well as the 8.5mm.
If you do fancy that, the same guy in the second listing has a 1/8 inch, long-series drill on offer but that might be too flexy.
Maybe a 4.8mm or 5mm drill from the first supplier might be a better bet.
I'll leave you to ponder that.

Note that although I speak as a bit of an engineer I don't guarantee that my suggestions will work.
But if it were my problem, that's the way I would be thinking of approaching it.

Finally, if it all goes wrong and you wreck the swingarm, I recall that Nasher was offering three ally swingarms for sale a while back and he may still have a couple left. I remember there being surprisingly little interest at the time.
http://www.ukmonster.co.uk/monster/s...ad.php?t=59456

Hope that helps, even if only to point you in a different direction.
And good luck.

ps.
As an aside, I wasn't aware when I fitted my ally swingarm that the steel channel/saddle washer existed.
My old steel arm didn't have one but obviously it wouldn't need one.
I can't really see the point of it anyway ... it only seems to hinder access to the nut with a ringspanner.
Maybe it was an assembly aid but I can't even fathom that tbh.
Anyway, I fitted mine just using a plain washer and I'd be inclined to recommend that you do the same.
The damn things are possibly no longer available anyway.
For what its worth, I also fitted a washer under the head of the bolt. Dunno whether that's std or not.
utopia is offline   Reply With Quote
Old 24-03-2024, 05:01 PM   #28
Dukedesmo
Registered User
 
Dukedesmo's Avatar
 
Join Date: Sep 2010
Location: Leics
Bike: M900
Posts: 2,842
If it's a standard 'hoop' swingarm then, you should be able to get access for a narrow sawblade from underneath, maybe an air powered reciprocating type would be best?

Of course that entails lying on the floor, cutting upwards or lifting the bike, lying it down on it's side or better yet, removing the swingarm to get it on the bench.

But I still wonder if welding in a long bit into the head of the bolt might work? you'd have something to work on and the heat might help free it...
__________________
M900, 916, LeMans II.

Dukedesmo is offline   Reply With Quote
Old 24-03-2024, 05:11 PM   #29
Dukedesmo
Registered User
 
Dukedesmo's Avatar
 
Join Date: Sep 2010
Location: Leics
Bike: M900
Posts: 2,842
To add, as per Utopia's post mine has no channel/saddle washer under the nut but then I built mine from a frame and swingarm sourced separately so it is not OEM and I have no idea how Ducati did it.

I too have a washer under both nut and bolt head, I have a stainless bolt/nut with plenty of copper grease on the threads to prevent binding plus, I know it's free as it's been off many a time - including a few months back when I replaced the swingarm.
__________________
M900, 916, LeMans II.

Dukedesmo is offline   Reply With Quote
Old 24-03-2024, 06:16 PM   #30
Mr Gazza
Lord of the Rings
 
Mr Gazza's Avatar
 
Join Date: May 2013
Location: Norwich
Bike: M900sie
Posts: 5,806
I'm with you all the way on drill bit quality Jeff. It seems hard to buy a good twist drill these days unless you get a mortgage out.

I'm not with you on this 8.5mm thread root though. There's no thread under the head.
Only the nut end is threaded, the rest is full 10mm and smooth as it passes through a silent block bush and it ain't good to have the bush portion threaded.

I do agree that an 8.5mm bit would be a good starting point to centre it and take out the bulk. A smaller diameter will just be more likely to snap in long series and much harder to centre in the head.
The final drill has got to be 10 or 10.5mm to take the head off, but luckily a bigger bit will be stronger.

DD; A reciprocating saw would almost certainly end up cutting the swinging arm if attempting to cut the head off, unless there happened to be a thick washer under the head.
You've virtually re-suggested my suggestions made earlier, but regarding cutting the nut.

I'd still advocate taking the arm and shock off if you can.
Remember also that if the arm is in the bike when/if you get to the belting the bolt out stage, that you need to support the bike by the frame and not on a paddock or side stand. As it will just all collapse once the bolt is out.
Pretty sure you'll have to take the rear exhaust pipe out too as I don't think the bolt will come out that way with the pipe in.

This would be a really good way to hold the bike to do this, even if you don't ride with it on.. and cheap enough too.
https://www.ebay.co.uk/itm/145642800...Bk9SR5qEl57OYw
__________________

Last edited by Mr Gazza; 24-03-2024 at 06:18 PM..
Mr Gazza is offline   Reply With Quote
Reply


Posting Rules
You may not post new threads
You may not post replies
You may not post attachments
You may not edit your posts

BB code is On
Smilies are On
[IMG] code is On
HTML code is Off

Forum Jump


All times are GMT. The time now is 09:21 PM.

vBulletin Skins by vBmode.com. Powered by vBulletin® Version 3.8.3
Copyright ©2000 - 2024, Jelsoft Enterprises Ltd.