UK Monster Owners Club Forum » .: Technical :. » Mods & How To's » Slow Monster rebuild

Reply
 
Thread Tools Display Modes
Old 30-01-2020, 06:26 PM   #1126
Darren69
Transmaniacon MOC
 
Darren69's Avatar
 
Join Date: Sep 2013
Location: Sutton In Ashfield
Bike: Multiple Monsters
Posts: 6,022
Engine looks beautiful btw, proper job!

I'd park the alternator issue for now, run it in then at oil change time replace and retorque it to the latest spec/parts and not lose any more sleep.

The main problem with these engines is they are so goddamn noisy normally you can't tell. I initially thought the squealing noise was the clutch on my 748 but when it stalled and wouldn't restart l realised and managed to catch it before it wrecked the engine. It still did a fair bit of damage but thankfully the crank was salvageable.
__________________
Roast Beef Monster!

Termignoni and Bucci - Italian for pipe and slippers!

S4 Fogarty, S4R 07T, 748, Series 1 Mirage
Darren69 is offline   Reply With Quote
Old 01-02-2020, 02:35 AM   #1127
350TSS
Too much time on my hands member
 
350TSS's Avatar
 
Join Date: Jan 2013
Location: Shipbourne
Bike: M900
Posts: 1,419
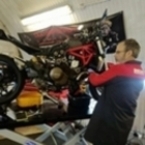
A frustrating day in the garage today, entirely avoidable and all my fault. I decided it was time to put the frame on the engine so everything trial fitted to the frame had to come off first.
I found the titanium studs I made up previously. I had been recommended to weld a titanium nut on one end to facilitate screwing the studs into the captive threaded portions on the lateral tubes on the RH side of the frame. I never got round to this so I resorted to grinding a slot with a 1mm cutting disc on one end of the stud. I made a bit of a Horlicks of the first one as the shower of dazzling white sparks caused me to lose my line and to cut the slot off centre.
Next, I needed to make some undersize nuts as a standard 10mm nut has 17mm flats and there is not enough room to get a 17mm socket inside the lateral tube and over the nut. I should have paid more attention to you guys when this was raised earlier.
I decided to bore out 4 x 8mm flanged nuts rather than a standard 8mm nuts as they fit nicely inside the tubes and the flange has anti-vibration serrations stamped onto the mating surface.
One disadvantage of this plan is that as flanged nuts are stamped out rather than just parted off a piece of hexagon bar, the flats are slightly conical to facilitate release from the press during manufacture. Gripping them in a vice or the lathe means that there is only a point contact rather than across the whole flat which means they wobble about when drilling and when trying to tap them out.
In order to get 4 reasonably good "undersize" nuts with concentric holes and perpendicular threads I had to make 6, which took a couple of hours as my 8.5mm drill
was a cheap one and refused to stay sharp (one day I will learn and stop buying cheap drills).
When I came to trial fit them I realised that the powder coating had compromised the first thread which was duly cleaned out with a large hand-turned countersink bit. I then realised that the thread in the frame was M10 x 1.0 and I had threaded the studs M10 x 1.25.
Measure twice and cut once!!!
The studs are now scrap.
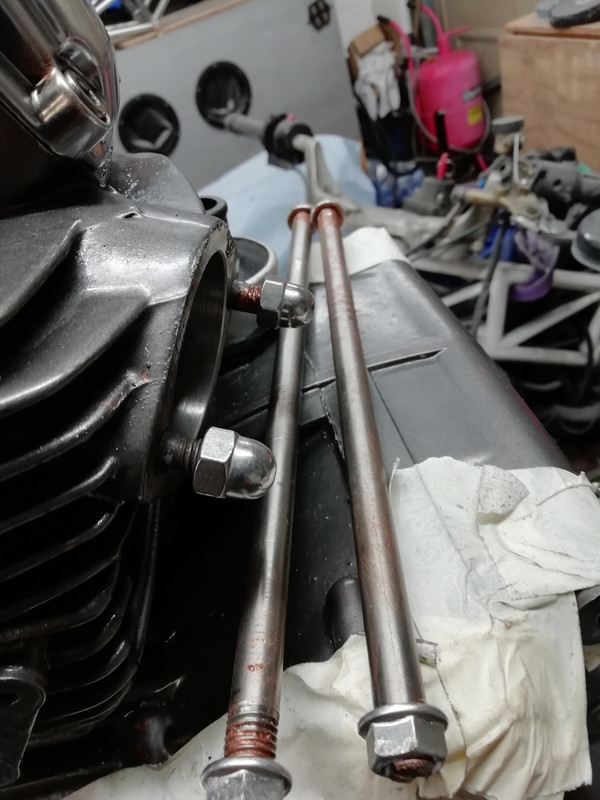
I turned my attention next to the exhaust studs, I want to fit dome-headed stainless nuts to prevent corrosion/erosion of the studs/nuts and to achieve this the studs have to be shortened. I wish I had remembered this before I put the heads back on as hacksawing the studs at awkward angles and with the crankcase in the way was a bit laborious.
Finally, I tried to put the engine on the frame, after about 20 minutes of struggling it was obvious that the powder coating on the inside of the lateral tubes would have to come off as there is no discernable "spring" in the frame. This meant about an hour with a small flat file. It's funny how when you want the powder coating to come off it is really hard and resilient but if you drop a 10mm spanner on it from about 3 inches it leaves a mark.
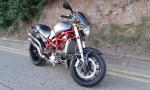
Last edited by 350TSS; 01-02-2020 at 02:41 AM..
350TSS is offline   Reply With Quote
Old 02-02-2020, 03:31 PM   #1128
350TSS
Too much time on my hands member
 
350TSS's Avatar
 
Join Date: Jan 2013
Location: Shipbourne
Bike: M900
Posts: 1,419
The frame is now on, using the old steel Allen bolts. I will replace these when I get to make some new titanium ones.
It looks very blingy and will get even more overpowering when the swinging arm and reaction hoop are in place and I think the paint job will need to be plain solid blocks of colour to tone it down a bit, i.e. no stripes and no pinstriping.
350TSS is offline   Reply With Quote
Old 02-02-2020, 03:52 PM   #1129
Moco1961
Guest
 
Posts: n/a
Now things are coming together! Love the frame engine combo....
  Reply With Quote
Old 02-02-2020, 05:00 PM   #1130
Luddite
Registered User
 
Luddite's Avatar
 
Join Date: Aug 2011
Location: Southampton
Bike: M1100evo
Posts: 2,465
Beautiful!
Luddite is offline   Reply With Quote
Old 02-02-2020, 05:12 PM   #1131
utopia
No turn left unstoned
 
utopia's Avatar
 
Join Date: Jun 2010
Location: leicester
Bike: M750
Posts: 4,545
That looks bloody gorgeous.
I thought about toning down the swearing but its too gorgeous for that.
And agreed about the solid blocks of colour.
utopia is offline   Reply With Quote
Old 02-02-2020, 07:34 PM   #1132
Mark64
Bronze Member
 
Mark64's Avatar
 
Join Date: Nov 2014
Location: Hondon de los Frailes
Bike: S4r
Posts: 285
Lovin your work fella, I'm a bit of a magpie, so I'm lovin all the shiny parts, keep the pictures coming, attention to detail, second to none
Mark64 is offline   Reply With Quote
Old 04-02-2020, 08:54 AM   #1133
350TSS
Too much time on my hands member
 
350TSS's Avatar
 
Join Date: Jan 2013
Location: Shipbourne
Bike: M900
Posts: 1,419
Despite only a couple of hours in the garage yesterday I was hoping for some reasonable progress.
The first task now is to get the bike on its wheels so that it is a bit more secure on the bike lift.
The swinging arm was located and then I had an awful struggle to get the pivot pin through the shims, I could get the pin 3/4 of the way through from either side but could not get the shims to line up to push the pin into the far side of the swinging arm. Eventually, I resorted to a) grinding a small lead in to the titanium pivot and b) using the old shaft to locate the side with 2 shims (1 approximately a mm thick and the other about 0.2mm) then driving the new pin through from the other side. Mainly, it was just awkward (or me being cack-handed) as you needed to be both sides of the lift at the same time.
I tested the grease nipple and pumped the void around the SA spindle full of grease, oddly, rather than forcing its way past the SA bearing seals on either side it squeezed out between the crankcase halves.
350TSS is offline   Reply With Quote
Old 04-02-2020, 09:41 AM   #1134
350TSS
Too much time on my hands member
 
350TSS's Avatar
 
Join Date: Jan 2013
Location: Shipbourne
Bike: M900
Posts: 1,419
Next up was fitting the rear suspension unit which I bought at the start of this project and has sat unloved in a box ever since.
There was a slight delay as all the holes that have attachment bolts or provide any lateral support had to have the powder coating removed so the shock or the reaction hoop could be fitted.
Having not given the Nitron shock more than a cursory glance before I was very impressed with the quality of manufacture, the attachment eyes at either end have proper spherical bearings with nicely fitted anodised aluminium top hat bushes that have rubber "O" rings to protect the bearing from the ingress of grit etc.
There is a 23 stop adjuster at the lower end which has a nice positive engagement. If it works as well as it is made I shall be well pleased.
how long are betta fish supposed to live
350TSS is offline   Reply With Quote
Old 04-02-2020, 12:45 PM   #1135
Albie
Fanactical volunteer
 
Albie's Avatar
 
Join Date: Oct 2003
Location: Kent
Bike: M900
Posts: 9,030
Looking good. I'm so pleased with new progress.
Albie is offline   Reply With Quote
Old 04-02-2020, 05:16 PM   #1136
350TSS
Too much time on my hands member
 
350TSS's Avatar
 
Join Date: Jan 2013
Location: Shipbourne
Bike: M900
Posts: 1,419
Thanks to all for the kind words of encouragement.
Started this morning with the fitting of the reaction hoop for the rear suspension which was a bit of a sod. First, neither of the new spherical rod ends would slide between the uprights welded to the SA as the powder coating was restricting the width, having filed the powder coating off, attached the rod ends to the hoop and got them level to within half a millimetre they would not engage in the uprights because I have fitted 25mm Stainless ride height adjusters. The extension pieces being at a slightly splayed angle following the profile of the hoop meant that the spherical bit with the hole in was about 1.5 mm too wide to locate in the uprights on the swinging arm. A quick clamp was employed to hold one side in place while I manipulated the other side.
Next the rear wheel was lined up and the rear axle would not go through the swinging arm, nor would the internal wheel adjuster blocks fit inside the SA. Another hour filing, I could have used acetone to soften it but did not trust myself to not cause other damage.
It was quite difficult to fit the wheel as the brake hanger on one side and the sprocket nuts on the other are perilously close to the SA.
Two problems emerged, the RH side chain adjuster fouls the brake hanger and the rear axle is not long enough.


The first I can deal with by trimming it down and re-polishing it. The second is a complete mystery as the SA spindle came from an S4 (25mm diameter) which has a wider wheel than the M900 so I am at a loss to understand why the axel is shorter. As it is the nuts on either side are only on about 2 threads a side.
Problem 3 is that the gear lever fouls my rear chain tensioner, by no means insuperable but annoying nevertheless.


I got the front forks roughly located in the yokes and attempted to put the front wheel in but my ratchet strap which is suspended from the rafters became coil bound and I could not lift the bike sufficiently to engage the front axle in the LH fork leg.
All in all solid if slightly frustrating progress today.


350TSS is offline   Reply With Quote
Old 04-02-2020, 10:15 PM   #1137
Dukedesmo
Registered User
 
Dukedesmo's Avatar
 
Join Date: Sep 2010
Location: Leics
Bike: M900
Posts: 2,842
The rear axle maybe too short because it came from a steel swingarm?

The ally swingarm is made from thicker and wider section box so the M900 axle is longer than that of an M600/750, don't know about the S4 swingarm though?
__________________
M900, 916, LeMans II.

Dukedesmo is offline   Reply With Quote
Old 05-02-2020, 07:50 AM   #1138
Darren69
Transmaniacon MOC
 
Darren69's Avatar
 
Join Date: Sep 2013
Location: Sutton In Ashfield
Bike: Multiple Monsters
Posts: 6,022
All S4 had the ally arm afaIk. So maybe its not an S4 one. I could measure mine in the bike if that would help. It would give you a rough idea.
__________________
Roast Beef Monster!

Termignoni and Bucci - Italian for pipe and slippers!

S4 Fogarty, S4R 07T, 748, Series 1 Mirage
Darren69 is offline   Reply With Quote
Old 05-02-2020, 09:10 AM   #1139
dacs
Registered User
 
dacs's Avatar
 
Join Date: Dec 2014
Location: Aylsham
Bike: Multiple Monsters
Posts: 193
My understanding (could be wrong, it's Ducati we are dealing with) is that all the alloy swing arms are the same basic dimensions. If so, the axle length is 322mm excluding the formed flange with the allen key hole in it.
__________________
NFN
dacs is offline   Reply With Quote
Old 05-02-2020, 08:46 PM   #1140
350TSS
Too much time on my hands member
 
350TSS's Avatar
 
Join Date: Jan 2013
Location: Shipbourne
Bike: M900
Posts: 1,419
Thanks guys - I must have a rogue rear axle - it came with a load of S4 bits I bought and I assumed it was correct for the bike I bought for £500 (less tank, seat, wheels front calipers and master cylinder (and crucially rear axel)).
If I had checked my own S4 I would have noticed the rear wheel axle has a socket head and is more of a tubular bolt.
The first job today was to fit the front wheel. This was hampered by a struggle with the coil-bound ratchet strap which I could not release. I just have not the knack of doing this and I hate to think how many hours of my life I have wasted trying to release ratchet straps. Giving it best I tied two knots in the part of the strap attached to the rafter which raised the front end about 3 inches and I got the front axle in.
It rapidly dawned on me that I was missing a spacer on the LH side as when I started to tighten the nut on the LH fork leg all that was happening was that it was bending the LH fork leg, other giveaways were the fact that the wheel was free to slide to the left until the LH disc hit the fork leg and there was no evidence of corrosion/exposure to the elements on the axle between the LH wheel bearing and the fork leg.


The next problem was how to determine when the wheel was central to the forks, I assumed that the disc rotor faces would be equidistant from the centre-line of the wheel and using a 6" ruler on the outside face of the rotor and using a Sharpie pen marked the ruler with the distance to the inside clamping face of each of the fork bottoms.
I adjusted the gap either way until they were equal. The bottom axle clamps were then nipped up.
The wheel spacer required needed to be the same as the distance between the inner race on the LH wheel bearing and the machined flat surface on the fork leg.
Measuring had to be done in situ so I used one of my internal sprung gauges.
This presented two further problems 1. the ends of the gauges are convex and the inner wheel bearing race was narrower than the diameter of the head of the gauge so it was a bit of a lottery whether you were measuring to the outward face of the inner race or the dust seal, 2 the size of the head of the tee piece on the gauge caused the inner adjustable limb to miss the inner race altogether. However I positioned it. I was measuring a hypotenuse, not the right angle distance.
In the end, I took 5 measurements and averaged them.
350TSS is offline   Reply With Quote
Reply


Posting Rules
You may not post new threads
You may not post replies
You may not post attachments
You may not edit your posts

BB code is On
Smilies are On
[IMG] code is On
HTML code is Off

Forum Jump


All times are GMT. The time now is 11:20 AM.

vBulletin Skins by vBmode.com. Powered by vBulletin® Version 3.8.3
Copyright ©2000 - 2024, Jelsoft Enterprises Ltd.