UK Monster Owners Club Forum » .: Technical :. » Mods & How To's » Slow Monster rebuild

Reply
 
Thread Tools Display Modes
Old 11-03-2020, 11:56 PM   #1186
utopia
No turn left unstoned
 
utopia's Avatar
 
Join Date: Jun 2010
Location: leicester
Bike: M750
Posts: 4,561
I was hoping you'd given the wiring a miss today.
I was going to post this earlier but I held back.
It seems like it might be ok now though, so here goes ....

Sometimes its all in the mind, so why not think about the wiring this way ...
Making the loom off a jig was always going to be an approximation as it always looks slightly different when you get down to the real thing. You were never going to get them just right first time.
Therefore, making the wires too long is actually the perfect outcome because now you can shorten them 'til they actually are just right.
Making them too short initially would have been disastrous.
So this is a good outcome. Don't spoil it at this stage.
Think how dissatisfied you'll feel when you're halfway through cutting and soldering with only a second rate outcome to look forward to, having been so close to perfection.
Compare that with the warm glow of satisfaction that will come as you look forward to a job well done if you refit the connector terminals.
utopia is offline   Reply With Quote
Old 12-03-2020, 08:48 AM   #1187
the lodger
Registered User
 
the lodger's Avatar
 
Join Date: Oct 2019
Location: Chorley
Bike: M900
Posts: 160
I feel your pain. However as it's ready to go I would connect it up as it is for now , bunching any excess wire somewhere temporarily. This is so you could check everything is working as it should. You could then, at your leisure, shorten a few at a time over a period of time and it might not be such a ball ache. It might even facilitate some finesse to the job, which may not be apparent if you do it all now.
__________________
Contents may settle !
the lodger is offline   Reply With Quote
Old 12-03-2020, 09:12 AM   #1188
Darren69
Transmaniacon MOC
 
Darren69's Avatar
 
Join Date: Sep 2013
Location: Sutton In Ashfield
Bike: Multiple Monsters
Posts: 6,095
Quote:
Originally Posted by the lodger View Post
I feel your pain. However as it's ready to go I would connect it up as it is for now , bunching any excess wire somewhere temporarily. This is so you could check everything is working as it should. You could then, at your leisure, shorten a few at a time over a period of time and it might not be such a ball ache. It might even facilitate some finesse to the job, which may not be apparent if you do it all now.
Yea, thats exactly what I would do, test it all first, then tidy up later or even make a complete new v2.0
__________________
Roast Beef Monster!

Termignoni and Bucci - Italian for pipe and slippers!

S4 Fogarty, S4R 07T, 748, Series 1 Mirage
Darren69 is offline   Reply With Quote
Old 13-03-2020, 09:44 AM   #1189
350TSS
Too much time on my hands member
 
350TSS's Avatar
 
Join Date: Jan 2013
Location: Shipbourne
Bike: M900
Posts: 1,422
Thanks for the sympathy guys - I hadn't considered doing a temporary tidy up and testing it all and then going back to it, the danger for me with that approach is that I would never get round to it, particularly with 6 other un-started projects in the garage that would take priority over a working bike.
Started this morning with getting the rear caliper central on the disc. I chose to fit the washers between the disc and the hub rather than spacer the caliper even though that meant 6 washers rather than 2, mainly because the caliper bolts were exactly the right length and the addition of washers would have made them too short,
I had the choice of stainless washers at 0.9 mm or BZP washers at 1.5 mm, It is virtually impossible to measure accurately and I chose the stainless and was rewarded with absolutely central disc/caliper relationship. Result!!
I then thought about the wiring and where best to start reducing the lengths on the limbs of the wiring harness, the headlamp/head stock/battery area is a complete nightmare, a tangle of knitting Where you start obviously affects whether some particular wire is too long or too short. The MU unit, immediately behind the head stock, has about 18 wires going into it, all relying on a 3 or 4 mm grub screw to hold them in place and a crimped on aluminium terminal end on each wire that I consider very marginal. So best not disturb that until I devise a system of supporting the wires, short and long term, so that the connection does not rely totally on the grub screw and the extremely marginal strength of the aluminium end connection. Rightly or wrongly I chose the rear tail light to start as it was the easiest, something I shall probably regret later.

With the rear brake hanger now in position it was now possible to incorporate the speedo sensor wire into the main fore and aft harness. The CoG of my wiring harness is and forever will be the point where this joins the main harness.

The sub harnesses for the rear brake light and the neutral switches both got shortened. Both of these were not without drama, the hydraulic switch to be fitted to the rear brake master cylinder was about 8 mm too long and would not grip the brake pipe union before the thread bottomed out in the master cylinder, 10 minutes on the grindstone sorted that.

The neutral switch should have been installed before the engine got put back in, access and visibility are extremely limited otherwise. I have a large box of old chewed up spanners and screwdrivers that can be modified to make special tools if necessary, a cheap old 1/4" Whitworth ring spanner had a slot cut out of the ring to pass over the cable and this allowed a rather laborious one flat at a time tightening of the switch into the crankcase.
That was as far as I got today
350TSS is offline   Reply With Quote
Old 14-03-2020, 02:20 PM   #1190
350TSS
Too much time on my hands member
 
350TSS's Avatar
 
Join Date: Jan 2013
Location: Shipbourne
Bike: M900
Posts: 1,422
I need to make up a set of oil cooler hoses. Early 900SS low level hoses would fit (without the additional pipes for the carb heater hoses) but Ducati want a lorra lorra money for them.
Does anyone know the thread sizes (or type designations) for the connections to the crankcases and the cooler itself? I cannot clearly identify the thread with my thread gauges.
I assume they are metric. Most of the fittings advertised on e bay are 1/2" BSP
Thanks
350TSS is offline   Reply With Quote
Old 14-03-2020, 03:19 PM   #1191
Albie
Fanactical volunteer
 
Albie's Avatar
 
Join Date: Oct 2003
Location: Kent
Bike: M900
Posts: 9,034
A fair few on ebay. Most come with cooler too but that could be sold off. USA has them but postage is the issue.

https://www.ebay.co.uk/itm/174148757459
Albie is offline   Reply With Quote
Old 14-03-2020, 03:25 PM   #1192
Mr Gazza
Lord of the Rings
 
Mr Gazza's Avatar
 
Join Date: May 2013
Location: Norwich
Bike: M900sie
Posts: 5,981
M14 x 1.5

Interesting thread here but photos have gone unfortunately. http://www.ukmonster.co.uk/monster/s...ht=timing+side
__________________
Mr Gazza is offline   Reply With Quote
Old 15-03-2020, 11:05 AM   #1193
350TSS
Too much time on my hands member
 
350TSS's Avatar
 
Join Date: Jan 2013
Location: Shipbourne
Bike: M900
Posts: 1,422
Thanks Mr Gazza - that is my next hour or so sorted, trawling the internet - also shame about the pictures in the other thread
350TSS is offline   Reply With Quote
Old 15-03-2020, 12:05 PM   #1194
350TSS
Too much time on my hands member
 
350TSS's Avatar
 
Join Date: Jan 2013
Location: Shipbourne
Bike: M900
Posts: 1,422
All parts bought - £40.57 - I went for 2 x 90 degree elbows and 8 x straight swivel seal AN6 connectors to get the hose from the crankcase to the LH side oil cooler connection as that way I can be sure I do not foul the exhaust pipe, more joints and more weight but safer in the long run I think.
350TSS is offline   Reply With Quote
Old 17-03-2020, 07:12 PM   #1195
350TSS
Too much time on my hands member
 
350TSS's Avatar
 
Join Date: Jan 2013
Location: Shipbourne
Bike: M900
Posts: 1,422
Not much progress the last few days as had to pick up No 1 and No 2 offspring prematurely from university, one from Birmingham and one from Oxford, unfortunately on separate days - total 13 hours on the most boring roads in Britain.
Sprayed the hugger mat black but it had loads of annoying little pin holes in the surface, so I filled it and either the filler, which is reaching the bottom of a 5 litre tin is going off or, more likely, I was a bit too Scrooge with the hardener so it took about 3 days to be hard enough to rub down.
It is however now done and looks OK, though I wish the design itself was not so obtrusive (think Hardly Dangerous Electraglide fenders as they call them).
Today was spent knocking up a support for the wiring entering the MU unit.
An added bonus of fixing the CoG of the wiring harness at the back of the tank is that I can shorten the limbs of the loom, most of which go to the MU unit, by simply shortening the wires as they enter it (without disturbing the AMP connectors at the other end).
My ETTC is now down to 89 hours of which 36 is wiring, 24 assembly and 29 is painting the tank, seat and fly-screen.
350TSS is offline   Reply With Quote
Old 21-03-2020, 05:08 PM   #1196
350TSS
Too much time on my hands member
 
350TSS's Avatar
 
Join Date: Jan 2013
Location: Shipbourne
Bike: M900
Posts: 1,422
Well the cable support certainly proved challenging, a right PITA in fact.
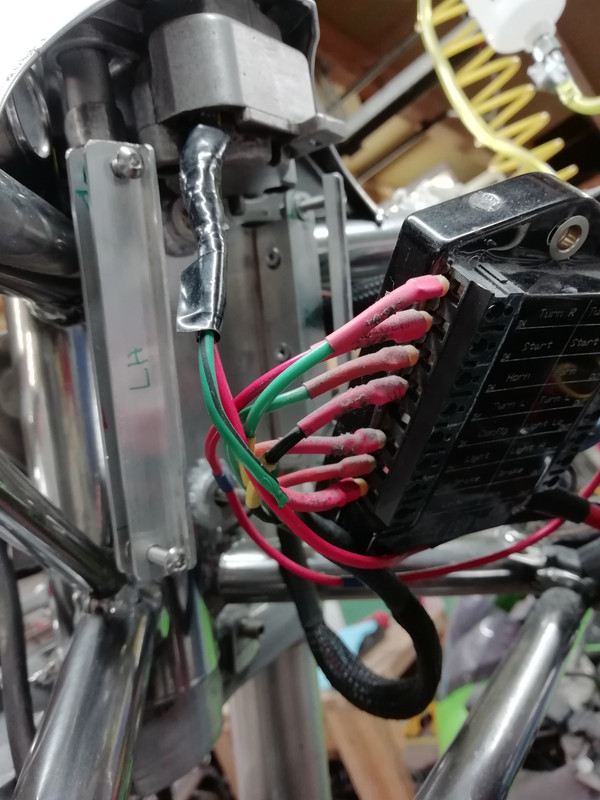
In order to get on with shortening the limbs of the loom I need the MU unit to be positively fixed and the cables to it to be held firmly in place. The MU unit relies on small grub screws clamping on crimped aluminium tails pushed into the unit. It is not satisfactory from an installation standpoint (one connection has already parted with all the manipulation the wiring has had over the last week whilst I decide where each wire will be routed) and, once running, I think the vibration etc will reek havoc with those connections when I eventually get to ride it.
I wanted something light and simple that held the cables in place and would be vibration resistant. The complication were the space envelope it had to occupy and it had to be something I was physically capable of making.
After the best part of 10 hours here it is:

the base is made from 1 mm aluminium with 2 lengths of 12 mm x 12 mm x 1 mm aluminium angle pop riveted on either side. It had to be 12 mm to move the MU unit away from the head stock tubes and allow a reasonably straight entry for the cables into the locating grub screws. 12 mm was however too deep so the Mu unit had to be spaced off the base plate, accordingly 2 x 6mm thick bosses were aluminium soldered to the base plate.
Not shown but on each side some closed cell draft excluding foam will be glued to the angle attached to the base plate and to the inside of the two clamps (also made of 12 x 12 x 1 mm aluminium angle with one side cut back to 3mm).
4 x 4 mm aluminium rivnuts were attached to the base plate angle and 4 x 4 mm SS button head socket screws will clamp the cables up into the foam,
It took a long time and I think it will work.
Here it is in position under the ignition switch.


I retired too cold to continue today but the wiring can continue next week, but for one thing, my son's car failed MOT and now he is back from university he wants to out driving it so I have 10 days to weld up the rear trailing arm hanger bracket or pay the MOT fee again. I think quite a lot of fabrication work is required plus more than a few hours lying on the cold floor. I really hate working on cars.
350TSS is offline   Reply With Quote
Old 23-03-2020, 06:32 PM   #1197
350TSS
Too much time on my hands member
 
350TSS's Avatar
 
Join Date: Jan 2013
Location: Shipbourne
Bike: M900
Posts: 1,422
Yesterday and this morning was fixing little perforations on my sons Honda Jazz. plastic inner wing had to come out before I could see what needed to be done and that meant removing the NS rear shock
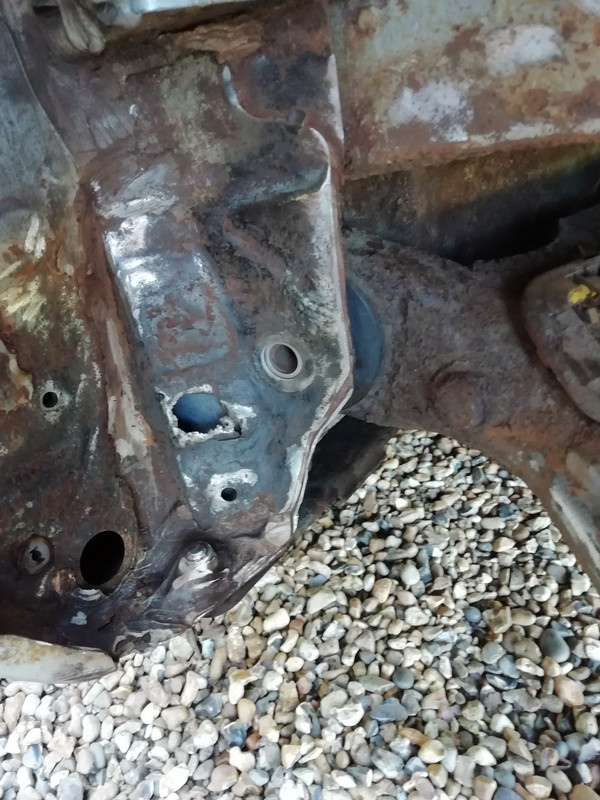
When the MOT tester gave me the news I was struggling to see the issue but with the inner wing off the hole next to the 19 mm bolt should not be there.

Here it is after half an hour with a flappy wheel on a 110mm angle grinder

I cut some 1.5mm plate and shaped it to fit and to reinforce the bolt hole, that took about an hour.
the holes around the top are so I can first plug weld it before seam welding all around the edge
websites for upload images
And welded in with filler over my bird **** welding to stop any moisture getting between the steel laminations and primed. Lashings of black underseal tomorrow and job should satisfy MOT man.
explain the difference between short term and long term goals.
350TSS is offline   Reply With Quote
Old 23-03-2020, 06:56 PM   #1198
350TSS
Too much time on my hands member
 
350TSS's Avatar
 
Join Date: Jan 2013
Location: Shipbourne
Bike: M900
Posts: 1,422
Next I made up a block to sit under my bike lift which has a positive stop leaving the table 28 inches above ground, This is too high for working on the wiring around the head stock and I do not trust the ancient hydraulic ram to stay at a more reasonable 14 inches without the load being taken off the ram seals. 2 x 9" x 3" baulks of timber cut 14" long worked admirably.
Finally about 2 o'clock I got down to some proper Monster work. I was about to bolt the rear hugger into position when I noticed that the filling I did a couple of days ago was showing through the mat black, not literally, but it was clear from the surface of the paint where it had been put. Clearly the paint continues to shrink as the solvent comes out of it.
It was rubbed down again and another couple of coats of mat black laid down. This is what it looks like now but I have a feeling I might be doing it again in a couple of days.

I did manager to shorten a couple of leads, battery to solenoid, battery through main fuse RCD to MU unit but I think I need to get the battery bought so I can wire exact lengths rather than guessing where the terminals will sit. There is a lot of mileage left yet in this wiring malarkey.
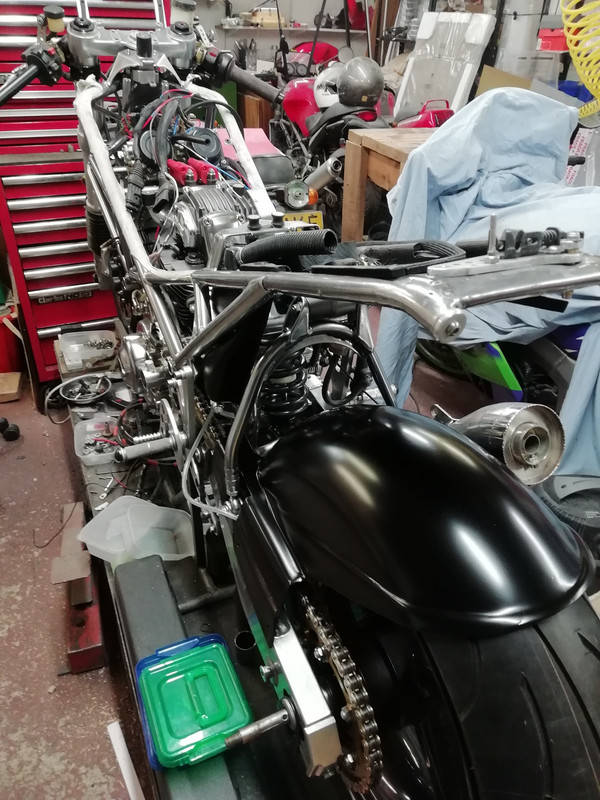
To keep my spirits up, a couple of state of play pictures.

350TSS is offline   Reply With Quote
Old 29-03-2020, 07:34 PM   #1199
350TSS
Too much time on my hands member
 
350TSS's Avatar
 
Join Date: Jan 2013
Location: Shipbourne
Bike: M900
Posts: 1,422
I have not had much time on the Monster wiring these last few days as I had to fix a couple of other issues on my son's Jazz. The previous owner had fitted some aftermarket door mirrors but without side repeater indicators, and the MOT tester failed it not just for the rust but the lack of side repeaters.
What a can of worms. In fitting the door mirrors there is a harness in each door that goes to the mirrors with a 9-way block connector, for bits that are not fitted to this particular model (electric mirror adjustment, mirror heaters etc etc.). The moron had simply chopped the wires exiting the 9-way block connectors with about 6 mm spare and left them all bare ended. Nearly sorted now (awaiting the supplier of new mirrors to send me two that were LH and RH handed and for the same make of car - Doh!!) so I could get on with the bike today.
I have abandoned the wiring support arrangement into the MU unit, it was just too difficult to get the dimensions to work in the constrained space, it was too wide to fit tight to the headstock and if I spaced the MU unit away from the headstock it fouled the ignition switch and, if I then lowered it, encroaching on the space for the Ignitech unit became the issue. I must have spent about 12 hours making it and trying to fit it.
I had another less than 100% outcome in making up the oil cooler pipes. I originally intended to use 2 x 90-degree elbows to carry the oil cooler pipe behind the exhaust pipe, but when I looked at it with the unions in my hand I realised that the use of 2 unions before the elbow (one to the engine and one to the elbow) would have meant that the pipe between the two unions would have to be about 10mm long else the pipe would foul the exhaust.
I am using SS braided 8 mm bore pipe and it is a right bugger to work to get the union to screw onto it without a) fraying the SS braiding and b) tearing the ends of your fingers to shreds on the wickedly sharp cut ends of the braid. In the end, I wrapped the end in masking tape and cut it through the tape with a 1 mm cutting disc in the angle grinder.
When I made up the hose to the LH side of the cooler it had to go through 2 x 90 degree bends and the hose looks as though it has distorted, not quite to the extent of cutting off the flow but certainly there is the possibility of a restriction. It might just be the pipe twisting as I do up the unions
I spent this afternoon routing the wiring from the seat to the headstock and doing it a second then a third time until I was satisfied that I had the best, most hidden route clear of the rear suspension rocker, shock absorber, belt covers, petrol pipes, choke cable etc.
The big trouble with everybody else being home is that the home job list seems to grow?????

Last edited by 350TSS; 29-03-2020 at 08:25 PM.. Reason: correction
350TSS is offline   Reply With Quote
Old 06-04-2020, 07:26 PM   #1200
350TSS
Too much time on my hands member
 
350TSS's Avatar
 
Join Date: Jan 2013
Location: Shipbourne
Bike: M900
Posts: 1,422
This last 10 days I have mostly been "faffing". Starting on something then getting distracted with something else and at the end of 3 hours, I had made bugger all progress on anything.
The trouble is that all the wiring is so congested around the headstock that touching or trying to sort one wire/one circuit out means that everything gets disturbed and the circuit you have just sorted is now wrong and needs re-routing. Its fiddly work and laborious and not at all satisfying.
Some progress has been made though, I have decided to discard my design for controlling the wires around the headstock as there just is not the room for it. No alternative solution for a great big bundle of wires, separately loomed suffering turning forces around the headstock is currently obvious.
I did manage to make an adapter to take the M900 brake light switch onto an S4 master cylinder.
I have 5 circuits to complete before I test it all
1. Hall effect ignition triggers to Ignitech unit
2. Ignitech unit to coils
3. Rectifier to dashboard charging light
4. MU unit to starter solenoid
5. Voltmeter to a switched power circuit
6. Power to camera and monitor switched circuit


If I had my time again I would a) definitely not have wired off the bike on a jig, b) probably not have used AMP connectors as they are quite bulky and quite long so require about 100 mm long straight runs and c) not put as many connectors into the loom and just wired component to component.

For the last 3 days, I have felt really, really tired to the point I slept 16 + hours a day consecutively, no other symptoms whatsoever. I do not want to go to the doctor as I am in a higher risk category as I should be on immune suppressants for rheumatoid arthritis although I had to stop them 2 weeks ago as I was on antibiotics for skin boils, a relatively frequent and bad side effect of the immune suppressants. Hopefully, I have now had the Covid thingy, maybe, maybe not.

Feeling better today I had strict instructions from SWMBO to get my 14 year old off electronic devices, a pleasant day was therefore passed instructing said boy on removing main bearings from a MZ TS125
nearest petrol station
350TSS is offline   Reply With Quote
Reply


Posting Rules
You may not post new threads
You may not post replies
You may not post attachments
You may not edit your posts

BB code is On
Smilies are On
[IMG] code is On
HTML code is Off

Forum Jump


All times are GMT. The time now is 06:29 AM.

vBulletin Skins by vBmode.com. Powered by vBulletin® Version 3.8.3
Copyright ©2000 - 2024, Jelsoft Enterprises Ltd.