UK Monster Owners Club Forum » .: Technical :. » Mods & How To's » Slow Monster rebuild

Reply
 
Thread Tools Display Modes
Old 23-08-2019, 06:10 PM   #991
Albie
Fanactical volunteer
 
Albie's Avatar
 
Join Date: Oct 2003
Location: Kent
Bike: M900
Posts: 9,034
Quote:
Originally Posted by 350TSS View Post
Thanks Utopia
I will try the Acetone - I have 2 x 5 litres of it to clean brushes after laying up CF.
Nylon is an excellent suggestion - just have to research where I can buy 10mm thick sheet.
Buy a cheap kitchen chopping board for nylon. Some are thick some are thin.
Albie is offline   Reply With Quote
Old 23-08-2019, 07:09 PM   #992
350TSS
Too much time on my hands member
 
350TSS's Avatar
 
Join Date: Jan 2013
Location: Shipbourne
Bike: M900
Posts: 1,422
Good call but too late for me - I paid 35 sobs for a bit 250mm x 250mm - bugger - 1000mm x 500mm was 135 squid
350TSS is offline   Reply With Quote
Old 04-09-2019, 08:07 PM   #993
350TSS
Too much time on my hands member
 
350TSS's Avatar
 
Join Date: Jan 2013
Location: Shipbourne
Bike: M900
Posts: 1,422
Had a week away in Cyprus – brilliant – lazed about and read a lot – “Chickenhawks” about US Huey pilots in Vietnam (not what I expected and very good) and re-read a book I read about 40 years ago “A day in the life of Ivan Denisovic” also compelling and better second time around.
Back in the garage today – even more brilliant.
Tasks planned were all about getting the petrol tank ready to join top and bottom halves so that I can move on to the seat.
First job was to machine out the indents that take the isolation mounts and move the tank rearward by about 10mm so that I can get full lock without recourse to adjusting the lock stops i.e. the frame/front fork tubes are the first point of contact. This took a little while as I needed to ensure the two indents were made a) as far forward as possible in the tank base to give the best chance that the lock stop adjustment was not necessary; b) centrally in relation to the actual location of the isolation mounts on the frame cross member; and c) that in addition to a) and b) the frame bridge did not clash with the tank base near the petrol tap. Points a) and b) were fine. Point c) will require further fettling (grinding out and a couple of layers of CF over the hole), still, better to get it right now than find the tank leaking because the frame bridge has worn a hole in it. Not good to have a hole there either as it is almost directly above the rear cylinder /spark plug.

upload image to url

Second job was to manufacture the “cotton reel” to hold the tank front retaining bungee, a mirror image of the rear tank retaining “cotton reel”. While I was at it I made an 8mm threaded nut out of some 13mm hexagon aluminium bar to secure it on the inside which was bonded in with araldite. Whenever I use a larger diameter hole saw to cut 3, 4, 6 or 10mm plate I always save the bit (washer) formed between the inner side of the cutting edge and the central drill hole. A 3mm thick one about 35mm dia was used to spread the load where the bungee will pull on the CF.

how to host pictures online
Next, I thought about the routeing of the water drain pipe through the petrol tank itself from the filler insert to the outlet pipe alongside the petrol tap. Particularly, how to protect the nitrile pipe from being damaged (holed and allowing water into the petrol tank itself) by the sharp edged CF baffles rigidly attached to the tank base. The problem is that the through pipe (6mm ID) and the joins at either end to the aluminium pipes must be petrol /water proof and the pipe must be resistant to constant immersion in petrol. I thought about using electrical grommets to protect the pipe where it passes through the baffles but rejected this on the grounds that the grommets might slowly chemically break down and the detritus would end up in the float bowls. So the 6mm drain pipe passes through a short length of 10mm bore nitrile rubber pipe bonded to the baffle.
350TSS is offline   Reply With Quote
Old 04-09-2019, 08:12 PM   #994
350TSS
Too much time on my hands member
 
350TSS's Avatar
 
Join Date: Jan 2013
Location: Shipbourne
Bike: M900
Posts: 1,422
The other issue with this is that the top of the drain pipe has to be connected to the aluminium entry pipe at the base of the filler insert in the top half of the tank, pass through 4 baffles on the lower half of the tank and be permanently connected to the aluminium pipe bonded to the lower tank base. When I come to put the two halves together I need space to get the pipe clamp onto the aluminium pipe bonded into the lower half of the tank. I do not want miles of extraneous pipe within the tank and I will definitely be time limited to make the connection before the bonding resin goes off. It will not be easy.
facebook image upload
Finally I finished off the vertical cam belt cover, I had to use 1mm aluminium in the end as 2mm just would not form to the convoluted shape of the CF cover. It is held on with 2 x 4mm and 3 x 3mm button head stainless cap screws.


ETTC after accounting for work not previously contemplated now stands at 183 hours. An imminent job I am particularly not looking forward to is loading the clutch hub with new rubbers (previously bought 2nd hand from Mr. Gazza)
350TSS is offline   Reply With Quote
Old 05-09-2019, 08:38 PM   #995
350TSS
Too much time on my hands member
 
350TSS's Avatar
 
Join Date: Jan 2013
Location: Shipbourne
Bike: M900
Posts: 1,422
First job today was to remove the 1mm polypropylene used to mould the tank base modification and to check that the extra clearance on the frame bridge had been achieved. The repair had holes in it so another couple of layers of CF were laid down when this had cured I then I applied a little filler to the bottom surface to tidy up the CF “patch”.
Cleaning the stippling brush, I had acetone handy so I thought I would try Utopia’s suggestion for removing the powder coating where it was not welcome. Whilst it did not magically wipe off, it softened the surface nicely, so I could scrape the powder coating off with a screwdriver blade. Thanks Utopia.
Next I re-manufactured the inner cam belt cover from 6mm aluminium plate as when I put the CF outer cover on the the Mk1 version there was a gap that would permit small children to enter the cam belt enclosure. This took a couple of hours.
I have known since I received these CF covers that I will have to modify the horizontal one to accommodate the Hall effect ignition trigger which works off the central cam belt pulley. The kit included a 3D printed ABS housing which bolts on the outside of the horizontal cam belt cover and partially encases the rotor with its rare earth magnets embedded and the signal receptors. The CF cam belt cover needed a 55mm dia hole cut into it to allow the rotor to be attached to the end of the double pulley. Working out how to cut the hole concentric with the pulley shaft was a bit of a challenge


The advantage of the hall effect system is that it runs at half engine speed, unlike the original Monster set up where the triggers work from the flywheel. This means no wasted spark on the exhaust stroke and more time for the coils to re-energise so hopefully a much stronger spark and a crisper response under load. Reading the Fastbikegear literature was quite educational, apparently the strength of a spark is dependent upon throttle position and revs and the air fuel ratio at the moment the coil discharges. With a carburettor engine the optimum mixture strength is rarely achieved (even when well set up). The carburettor has basically only 3 steps, slide cutaway/ pilot jet, needle position which is variable but not optimised across the whole range of its movement and main jet. When the fuel air ratio is not optimised a stronger spark is needed to compensate minimum c 30k volts. Fuel injection on the other hand through the ECU monitors all the parameters, temperature, throttle position, revs, and meters the fuel much more precisely and thus can get away with a much less energetic spark c 20k volts (those horrible unreliable stick coils on an S4).
350TSS is offline   Reply With Quote
Old 06-09-2019, 04:41 PM   #996
350TSS
Too much time on my hands member
 
350TSS's Avatar
 
Join Date: Jan 2013
Location: Shipbourne
Bike: M900
Posts: 1,422
Having now got the tank to sit where it does not clash with the forks on full lock I spent the better part of today trying to get the seat to sit in the right place. I wanted to shorten the seat base having previously extended it by about 50mm. I was anxious to get the seat/tank interface just right, with the seat enveloping the rear of the tank rather than a shaped tank rear and a straight line for the start of the seat base, also to get the base line of the seat to be a continuation of the line of the bottom of the tank. This was not easy as the tank profile changes with height above the frame rails and the leading edge of the seat base slopes downwards rather than being parallel with the frame rails.
I thought I wanted to cut off about 50mm from the front of the seat base. Rather than doing it in one hit I decided to do 25mm first and see if I could get the leading edge profile to match the tank. There was no way of measuring it. I had to hold it at the correct height with one hand and sketch the profile in pencil on the seat base that I saw 25mm away from the tank edge. It had to be done by eye alone. After the first cut and some very slight adjustment I was well pleased with the way it turned out.
I was about to copy the line made by my cutting 25 mm further back when I thought is the seat base big enough for my “bottle and …..”. Luckily I realised that it was but only just – time to stop cutting.
The next challenge was to get the seat height correct along its length. This is not helped by the fact that the seat base itself is assymetrical, one side sits about 6mm higher than the other, whilst the hump is flat and rests nicely on a flat surface along with the right hand side of the base, the left hand side has 5 to 6 mm of daylight showing. I blame poor workmanship.
I started in the middle of the seat (just in front of where the hump rises) working towards an objective of getting the bottom line parallel with the frame rail with about half the frame rail showing from the side elevation. This location gives me the best chance of setting the correct height across the whole length of the seat. After a couple of iterations with oasis foam I think I managed to get it about right so then I bonded in my saddle clip mount.

image ru

Next I mixed up 180ml of ethanol resistant resin (Caswell tank sealer) and applied it to the internal surfaces of both the top and bottom halves. The resin is very viscous and the hardener is slightly thinner but the resultant mix is about the consistency of Araldite (on a cold day). It is difficult to believe that this stuff will flow onto the crevices when I bond the two halves together. I think I will leave this at least 3 days to cure properly before attempting the bonding of the two halves together. Truth is, I am a bit scared of bonding together job, if it goes horribly wrong as I am certain it will, then there will be a mountain of extra/repair work.
350TSS is offline   Reply With Quote
Old 11-09-2019, 03:22 PM   #997
350TSS
Too much time on my hands member
 
350TSS's Avatar
 
Join Date: Jan 2013
Location: Shipbourne
Bike: M900
Posts: 1,422
I started yesterday with the intention of bonding the top and bottom halves of the tank together, but on close inspection of the last coat of ethanol resistant resin I found “holidays” in the coverage. I therefore had to mix up 40ml and apply it to the areas missed. Bonding together will have to wait until this second coat of Caswell’s finest cures.
The cured Caswell resin is very hard, shiny and clear and I am confident it is up to the job of sealing, if only I can be sure I can get it to all the crevices inside the tank once it is bonded together. I am leaning towards putting the resin pot into very hot water before mixing those batches that have to go in through the filler neck.
Attention then turned to the seat base front mounting and a block of oasis foam was shaped and bonded into place. The location of the forward forks (yet to be made in 10mm nylon) is determined by the positioning of the aluminium plate now bonded in. This is critical as the rear saddle clips do not quite give sufficient lateral strength to ensure the front of the seat cannot move about (the saddle clips are too close together along the frame tube - c 40mm apart). The nylon forks will have to engage with the frame bridge so that it is not possible for the front of the seat to move sideways. I hope I have got it right but will not know until the resin cures. The saddle clip mount also acquired another lamination.
350TSS is offline   Reply With Quote
Old 11-09-2019, 03:35 PM   #998
350TSS
Too much time on my hands member
 
350TSS's Avatar
 
Join Date: Jan 2013
Location: Shipbourne
Bike: M900
Posts: 1,422
Today I tried to remake the rear light /camera mounting assembly. The old one with an awful lot of lumiweld on it was actually quite heavy. The number plate mount will be separated from the light assembly so the seat is easily removable leaving the number plate and associated lights hanging from the plugs in the end of the truncated frame tubes – design not yet thought through.
The blank was cut out from 2mm aluminium and then bent up. The welding did not go well. I forgot to clean the sheet with acetone before scrubbing with a SS wire brush and as the heat was applied an oily film emerged from the metal (presumably lubricant used during the rolling process) which then boiled and the lumiweld would not take at all.
Halfway through this one of the fluorescent luminaires in the garage started flickering badly then stopped working. I shrugged and carried on, then I smelt burning and started looking round for anything I had set light to with the torch but when I looked up smoke was blackening the ceiling above the now non flickering luminaire. Better turn the lights off then. There followed a bit of a pantomime as I climbed on my swivel chair to undo the screws holding the cover on the luminaire. They were very tight and rather than the screw undoing it stayed exactly where it was and I rotated around it as the swivel on the chair revolved.
I did manage after a fashion to bond the top and bottom halves of the tank together. In the end I used JB Weld (water weld) but made the mistake of applying it to the edge of the base then tried to put the tank top over it. By the time I had applied the putty to the entire bottom seam it was already starting to become unworkable and so when I tried to get it into the exact position it was already gripping and would not move. The top is about 5mm lower one side than the other as a result. Also the likelihood of this first pass of being a petrol tight seal is nil. I will wait until it cures and then have another go from underneath. Finally I will have the Caswell stuff to pour into the filler neck if only it will actually flow to the bottom of the tank.
Attaching the drain tube through the tank was not the nightmare I envisaged.
350TSS is offline   Reply With Quote
Old 12-09-2019, 07:37 PM   #999
350TSS
Too much time on my hands member
 
350TSS's Avatar
 
Join Date: Jan 2013
Location: Shipbourne
Bike: M900
Posts: 1,422
An arduous day today but it was ultimately almost a success. Almost, because I did not finish what I started but the task to manufacture the forks to engage with the bridge on the frame was difficult and but for further electrical problems would have got done.
It started badly with my Dremel replacement going “phut” and refusing to turn more than one revolution each time it was turned on and finished with my heat gun going “phut”. Both are terminal cases.
I had to spend about an hour and a half working out the positioning of the seat and the shape of the hook, First I established a datum on the frame and measured everything from that point or rather the line drawn on the frame to correspond with the bottom edge of the seat then I cut a cardboard template which looked OK when I offered it up. The first attempt on the LH side hook for which I used the 10mm nylon as suggested by Utopia turned out to be too long by about 20mm but was relatively easily modified and is now just about a perfect fit.


The RH one was more difficult as the plate bonded into the seat has the threaded holes too far inboard by about 10mm and in consequence the hook clashes with the rear suspension rocker casting. At this point I had 4 options:
a) remake the plate already bonded to the seat – too much work
b) make a fillet that bolts to the existing holes and bolt the hook onto the outside of it – may still come into play but would be an untidy way to do it
c) drill and tap new holes in the plate – not the best position because the plate is only 3mm thick aluminium and I do not see the threads holding in the long term
d) put an S bend in the nylon hook to allow clearance on the suspension rocker hence the heat gun and why progress stopped until tomorrow
350TSS is offline   Reply With Quote
Old 13-09-2019, 08:23 PM   #1000
350TSS
Too much time on my hands member
 
350TSS's Avatar
 
Join Date: Jan 2013
Location: Shipbourne
Bike: M900
Posts: 1,422
Today I finished the RH seat latch fork which took most of the morning, bending 10mm nylon is not that easy, particularly when you make the first bend the wrong way - DOH!!! Also getting it to clear the rear suspension rocker took quite a bit of buggering about. It seems to be correctly positioned now and robust enough for the intended purpose.
Whilst messing about with the seat, taking it on and off about 100 times I became disillusioned with the 4 x saddle clip arrangement as the central locating method.
Soon after I got the Monster I was knocked off it by a bloke U turning without indicating as I filtered down the outside of a column of traffic. He did a runner and I needed a new tank but the old one, severely dented, is in my garage loft.
The old front tank mountings will be just the job for my central seat location method. The hole pitch did not match the holes I drilled for the saddle clips but they are sufficiently different to allow me to re-drill and tap the second hole without interfering with the existing drilling. This is a much more satisfactory solution with the only downside being the weight of the tank mountings themselves.
With the front mounting sorted I turned my attention to the rear latch and how to attach it to the seat. I was cognisant it has to be accurate to a couple of mm in 3 dimensions or it just will not work (or worse it will engage but not disengage). My original plan had been to shape some “oasis” foam from the top of the hump and encase it in CF to form a sort of buttress that the latch plate could be bonded to. The more I thought about it though the more I realised that the chance of me getting the latch plate within a couple of mm in any direction was disturbingly small.
After about 3 cups of tea and about 5 “oily rags” I came up with the following:
a) bonding in the diaphragm to the seat hump base
b) cutting a rectangle of CF about 20 mm larger than the latch base and attaching it to the latch base
c) cutting down a Chinese take away container to act as mould and inserting that underneath the CF rectangle – effectively forming a recess in the seat hump diaphragm
d) ascertain the position of the recess and cutting a hole a mm or so smaller in each dimension. The takeaway box is sufficiently flexible to conform to the smaller hole and this will hopefully seal the hole when f) below is undertaken
e) fitting the latch to the locking mechanism so it must be in absolutely the right place
f) pushing the seat, the diaphragm and the hole within it over the latch mechanism then laminate CF around the outside of the takeaway container and joining to the rectangular CF plate. The diaphragm is roughly parallel with the two rear frame rails rising rearward at about 60 degrees, the latch mechanism is approximately parallel with the ground so the recess will end up being wedge shaped.
With all the thinking time spent I did not get time to actually do it but a start was made.
I also went round the tank seam with another application of JB weld which I think now has about an even chance of being petrol tight, although there will need to be some time spent tidying up the surplus.
ETTC is now down to 163 hours

free image uploader
350TSS is offline   Reply With Quote
Old 17-09-2019, 07:17 PM   #1001
350TSS
Too much time on my hands member
 
350TSS's Avatar
 
Join Date: Jan 2013
Location: Shipbourne
Bike: M900
Posts: 1,422
I only managed an hour in the garage yesterday but did get the seat hump diaphragm bonded into place. First I applied resin resistant tape to the outside of the seam them copious resin applied to fill any gaps and then 3 laminations of 25mm wide CF woven tape. It seems to have worked OK.

I then spent half an hour rubbing down the JB Weld on the tank seam, it is a lot harder than filler and does not easily rub down to a polished surface. It stays with a very granular surface. By the nature of where it is, it is awkward to rub down, a block can only be used on about 25% of the area to be smoothed off and getting a smooth leak free seam is going to take a good few hours to complete.
Today was spent bonding in the seat latch mechanism to the seat diaphragm, which was not easy as access was via the glove box hole and then only to the 3 sides visible. First I had to make up a 6mm spacer to raise one side of the seat. It is now as near as dammit level but a bit higher than I really wanted (about 6mm).

attractive baby boy names

I shall probably end up having to apply a lamination from the outside. It was quite tricky to keep the resin away from the latch mechanism itself. Once the resin was applied the seat was gaffer taped into the right position and it was left to cure. Tomorrow will tell.


upload img


I am re-considering the rear light mount yet again and the reason is that the final position of the seat and the under hump diaphragm to which the light is attached is virtually parallel with the rear frame rails, i.e. rising at 60 degrees. . The LED lights will be attached to a 2mm x 15mm deep and 480mm long strip bent in a curve to match the tail profile of the seat hump. (If I can get the lumiweld to take – big if) attaching the strip to the diaphragm it will be at 90 degrees to the diaphragm so the lights will be pointing skywards. To get the lights to be vertical throughout the length of the strip I will need to cut the 15mm wide mounting strip with a compound curve (at 90 degrees at the sides progressively changing to 60 degrees at the end and back again). I definitely do not have the maths or the skill to do that.
350TSS is offline   Reply With Quote
Old 17-09-2019, 08:26 PM   #1002
Raven
Guest
 
Posts: n/a
Could you give me some details on the led lights please. I need to mount some on my postbox to stop people backing into it and knocking it over. Cheers.
  Reply With Quote
Old 18-09-2019, 05:19 AM   #1003
350TSS
Too much time on my hands member
 
350TSS's Avatar
 
Join Date: Jan 2013
Location: Shipbourne
Bike: M900
Posts: 1,422
If not a joke then these are they
https://www.banggood.com/17LED-Motor...r_warehouse=CN
350TSS is offline   Reply With Quote
Old 18-09-2019, 08:13 PM   #1004
350TSS
Too much time on my hands member
 
350TSS's Avatar
 
Join Date: Jan 2013
Location: Shipbourne
Bike: M900
Posts: 1,422
Today the seat was the focus of attention, first I took the Chinese takeaway box mould off and as expected the non visible side of the recess had great big holes in it. These we taped up from the inside and 2 laminations of 25mm CF tape were used to fill the gaps. At the same time I added a further lamination to the plate supporting the front seat mount.

I also cut out a CF fillet to close the hole between the diaphragm and the seat base and this was duly bonded in. Some time was also spent restoring the exterior surface of the hump where resin had seeped past the “resin resistant” tape and formed runs where I did not want them.

I turned my attention to the number plate lamp and think I have come up with a cunning wheeze to mount it onto the two truncated frame tubes and at the same time provide a “fairing” to hide the semi-exposed seat latch mechanism (caused by the seat being about 20 mm higher than I had originally anticipated at the point where the latch engages).

Whilst congratulating myself on this design it has just dawned on me that in completely enclosing the seat hump as I have now just done I have no way of getting a 5 way AMP connectors and associated wiring to the rear lights, indicators and number plate lights through from the tool tray to the rear lights. The AMP connector needs to sit cocooned away from being pressure washed by spray from the rear wheel, salt and other debris. The wiring harness I have made allows this to happen and I have just sealed it off – not insuperable but annoying nonetheless.
350TSS is offline   Reply With Quote
Old 19-09-2019, 08:38 PM   #1005
350TSS
Too much time on my hands member
 
350TSS's Avatar
 
Join Date: Jan 2013
Location: Shipbourne
Bike: M900
Posts: 1,422
The two things achieved today were
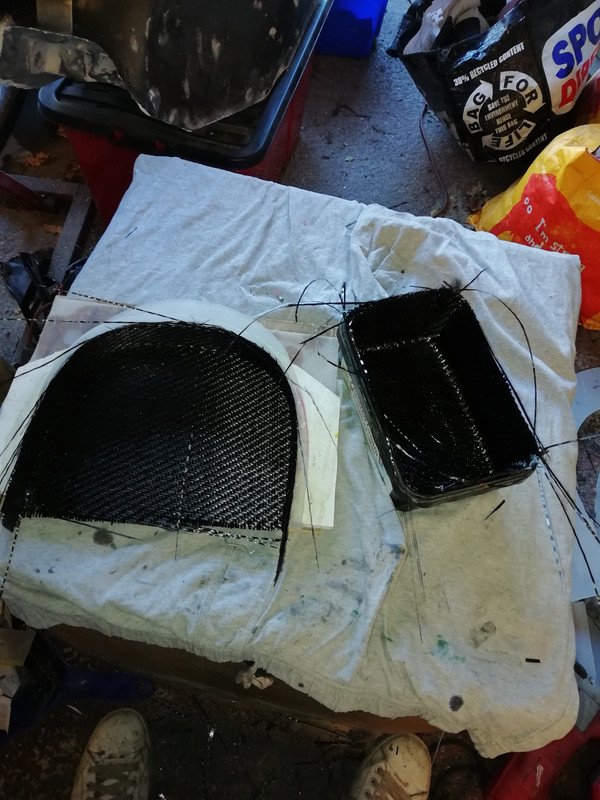
a) a mould for a CF rear light/camera mounting which was then laminated; and
b) a mould for the rear number plate which will incorporate a fairing to mask the seat latch mechanism also laminated.
With regard to a) I glued some 1mm polypropylene to a sheet of plywood and then glued on top the profile of the light holder cut from 3mm polypropylene with some 10mm estate agent board also cut to the same profile to act as packing between them. I then cut some 1mm polypropylene to form a smooth upstand that the LED strip lights can be attached to.
I cut this on a large radius curve so that the upstand would sit at an angle to the base such that when it was attached to the bike the lights are vertical not pointing upwards at 30 degrees.
In glue-ing the profiled bits I displaced the top 3mm polypropylene about 3mm forward in an attempt to make the replicate the angle.
When I hot glue gunned the 1mm upstand to the mould, as the hot glue cooled the polypropylene moved a bit and despite my best efforts the actual angle achieved was something like 80 degrees when I had hoped for 60 degrees.

With regard to b) I used a Cornish ice cream plastic tub to form a mould. The base of the tub was slightly profiled so I cut some 1mm polypropylene to line the bottom. This will fit between the two rear frame rails and extend downwards to provide the mounting point for the number plate. Above the frame rails it will be cut at an angle that matches the slope of the seat base and it will extend forward to cover the seat latch mechanism. Below the frame rails the open box will be cut at an angle so that at the bottom there is a stiffening return of maybe 6mm whilst at the top the box will be full height (if that makes sense).
To mount it I will cut from the CF sheet already made a plate that will attach to the truncated frame tubes and this plate will be slotted into the triangular cut box and then be bonded in. Confident it should work and will be light in weight. It has the advantage that I can manufacture in stages and get each relative angle right rather than trying to do it all at once (issues are angle of the bottom of the seat, depth of the truncated box necessary to cover the latch mechanism and provide sufficient slope for the number plate to clear the rear tyre on full suspension compression and the angle of the downward facing truncated rear frame tubes and the threaded bushes therein.
350TSS is offline   Reply With Quote
Reply


Posting Rules
You may not post new threads
You may not post replies
You may not post attachments
You may not edit your posts

BB code is On
Smilies are On
[IMG] code is On
HTML code is Off

Forum Jump


All times are GMT. The time now is 09:21 AM.

vBulletin Skins by vBmode.com. Powered by vBulletin® Version 3.8.3
Copyright ©2000 - 2024, Jelsoft Enterprises Ltd.