Register | FAQ | Members List | Calendar | Today's Posts | Search | Contact |
|
Registered
Members: 676 | Total Threads: 50,947 | Total Posts: 519,479 Currently Active Users: 2,090 (0 active members) Please welcome our newest member, Humph |
|
|
Thread Tools | Display Modes |
15-10-2018, 04:22 PM | #766 |
No turn left unstoned
Join Date: Jun 2010
Location: leicester
Bike: M750
Posts: 4,562
|
My "other" bike has conventional forks with gaiters.
The stanchions underneath are 22yrs old and are still perfect, despite many years of total inattention. So I can understand your thinking on fitting gaiters. Mine have drainage holes and have never held any water on the few occasions that I've looked underneath. Darren makes a good point about the seals being less susceptible in usd forks though and my feeling is that protection of the stanchions from stone chips etc is possibly more important than keeping out the dirt and moisture in usd forks. Either way, its refreshing to see function being considered over style ... there's way too much of the opposite thinking in the bike world these days. |
16-10-2018, 09:54 AM | #767 | |
Registered User
Join Date: Jun 2018
Location: Clevedon
Bike: M1200s
Posts: 565
|
Quote:
__________________
Keep the rubber side down. Mick Last edited by mickj; 16-10-2018 at 09:56 AM.. |
|
16-10-2018, 11:42 AM | #768 | |
Registered User
Join Date: Sep 2010
Location: Leics
Bike: M900
Posts: 2,901
|
Quote:
I don't have the abba balancer either, rather the £35 ebay special which was supplied with the thinner alloy cones (on 12mm shaft) which are fine for conventional 'bearing-ed' wheels as would be the paddock stand with bearings types. As per abba's website; "Designed to fit most VFR's, Ducati's, Triumphs and some BMW models." so I think it should work with the 1200S as that would be the same as most modern Ducati from 1098 - (larger displacement) Panigale etc. as although the hub is larger, I don't think it's by much? They also make a different model for BMW K1200S/R, K1300S/R, 1200GS and GS adventure; https://www.abbastands.co.uk/product...adapter&pid=51
__________________
M900, 916, LeMans II. |
|
16-10-2018, 07:34 PM | #769 |
Too much time on my hands member
Join Date: Jan 2013
Location: Shipbourne
Bike: M900
Posts: 1,422
|
Sitting here with a small headache having been fibre-glassing the patterns today, I wanted to keep the temperature up so the resin cured nicely which meant the door of the shed closed and therefore an excess of acetone fumes. Good progress though as all the “easy” patterns were given a coupling resin coat on the back of the gel coat which was nicely tacky from yesterday and at least one layer of 100g chopped strand mat. Tomorrow they will get 3 layers of 300g chopped strand mat and if the release agent works as it should the following day I will have some moulds.
post pics |
16-10-2018, 07:38 PM | #770 |
Too much time on my hands member
Join Date: Jan 2013
Location: Shipbourne
Bike: M900
Posts: 1,422
|
In between coats I thought I would see if I could resolve my brake hanger clearance issue. The more I thought about it and drew it out I could not understand why the disc was not sitting central to the calliper. I was really sure that I had measured it right and made it so that there should not be a problem.
It turns out the problem was a mismeasurement on my part not on the lateral positioning of the disc but rather on the distance of the calliper from the centre of the wheel spindle. I had made my brake hanger and drilled the mounting holes for the calliper 0.5mm too small a radius. This was compounded by the cheapo Chinese disc which had a radiussed outer edge. The edge of the Brembo disc is right angular. So the new disc was c 0.25mm larger than OEM although the machined (wearing) face was the same size. The bridge of the calliper was fouling the outer edge of the disc and would not permit the hanger when the spindle was inserted to sit square. The spacering of the disc outwards was correct but the calliper could not straddle the disc at right angles. I had 3 options at this point 1. remake the hanger bracket – I really could not face a Mk 5 2. relieve the inside of the bridge of the calliper by 0.5mm – not easy to do and I do not want any swarf or filings anywhere near the seals (which are OK) 3. reduce the OD of the disc – I checked the pads run inside the OD so no loss of braking swept area and no risk of the pads getting a wear lip on the outer edge. I came up with this contraption which put it in the pillar drill and applied a 115mm angle grinder with a floppy abrasive wheel in and the disc is now 1mm smaller on OD (and about 20g lighter). Lo and behold the brake hanger now fits – result. upload png |
16-10-2018, 07:41 PM | #771 |
Too much time on my hands member
Join Date: Jan 2013
Location: Shipbourne
Bike: M900
Posts: 1,422
|
The clearance between the hanger and the disc attachment bolts will be resolved by machining 2mm off the head of the bolts, currently 5.6mm deep which will give we about 1.5mm clearance
|
17-10-2018, 06:00 PM | #772 |
Too much time on my hands member
Join Date: Jan 2013
Location: Shipbourne
Bike: M900
Posts: 1,422
|
Bit of a slow day today, only managed one cladding of ¾ of the patterns with 300g chopped mat. It took simply ages to stipple it so that there were no air bubbles and I found that when I started on the second batch the first batch had developed air bubbles of their own accord, suspect it is due to the curing action generating a bit of heat or giving off some form of gas.
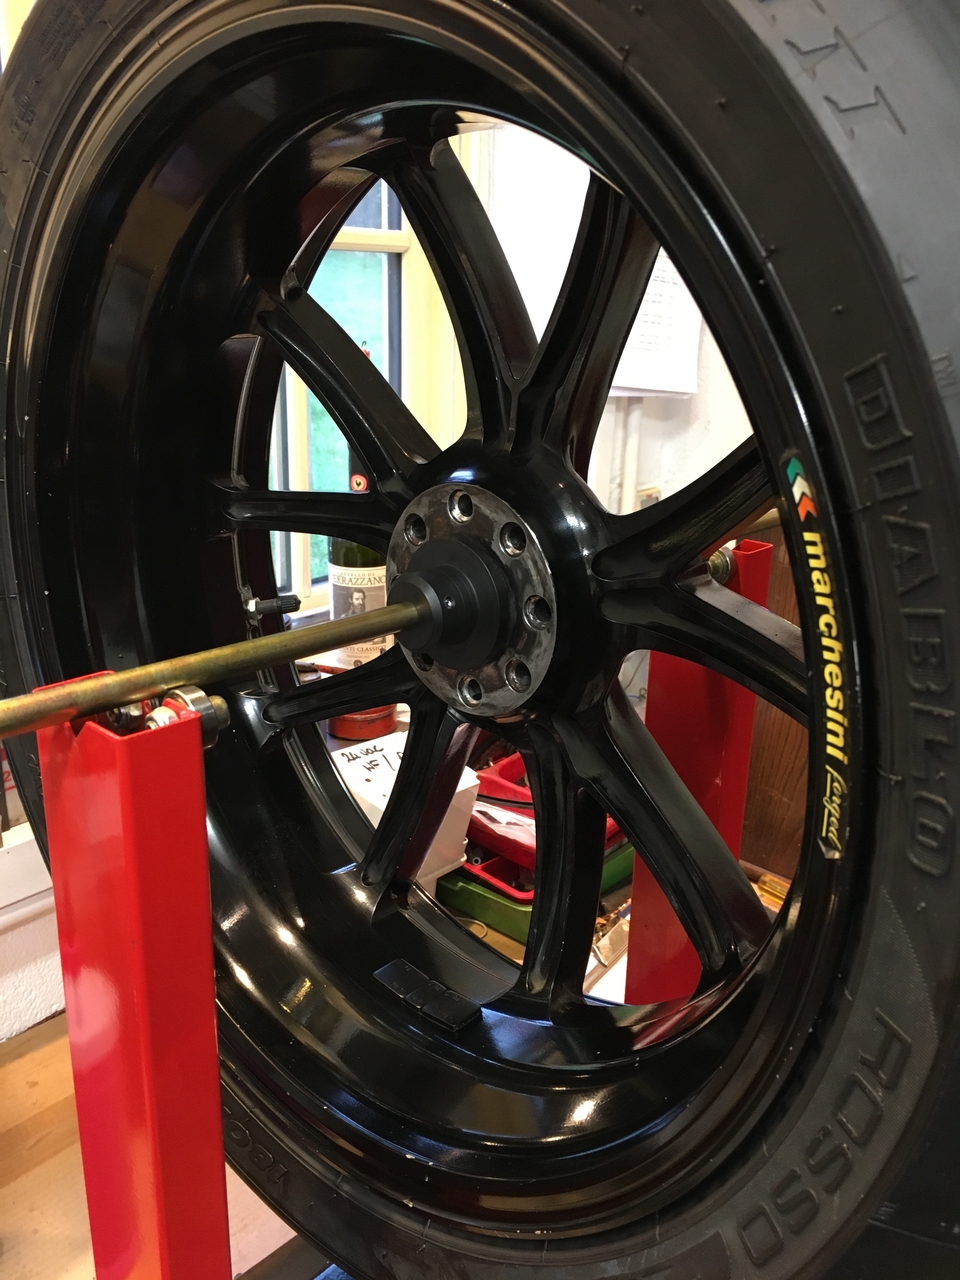
On the plus side:- 1) my estimated hours to completion dropped below 275 for the first time even taking into account an extra few day’s work obviously necessary to finish these patterns/moulds; and 2) these goodies arrived this afternoon, the wheel balancer, a jig for drilling nuts and bolts to enable them to be wired and titanium bolts for the callipers and discs and fork leg clamps. I think I have some incurable disease as I must be mad to spend more on this relatively meagre collection of bolts than I did on two new tyres |
21-10-2018, 06:50 AM | #773 |
Too much time on my hands member
Join Date: Jan 2013
Location: Shipbourne
Bike: M900
Posts: 1,422
|
The wheels now balanced, the balancer worked well. The front wheel required 20g and the rear 25g so I do not think I wasted my time. I did it without the discs fitted which might be a mistake.
It is one of those jobs though that it is very difficult to know when to stop. I made a mental rule that after adding a weight the wheel had to stop at 5 different positions (within any 10 minutes segment around an imaginary clock face if that makes sense) and then it could be considered in balance. I had two slight concerns in the process: 1) I could only get 5g steel weights (which were not easily cut down as lead weights would have been) and I felt that I could have done a better job if I had access to 2g and 1g weights; and 2) The area where weights could be stuck to the Dymag wheel rim did not match the profile of the adhesive pad on the back of the weight (too narrow and slightly convex) so I have a concern that the weights may not stay where they were applied. I will take a couple of photos so if any go missing in the future I can replicate their replacement without removing the wheel. Otherwise the mould making continues and all “easy” moulds have now had 3 layers of 300g chopped strand. I have used over 5kg of resin so far and these are all the smaller moulds. I will leave the moulds for a couple of days to cure fully before trying to separate them. I am quite nervous of the outcome when I do try to split them as I have a lot of time (and not inconsequential money in materials, resin, hardener chopped strand glass mat) invested in getting thus far. Concerns are: Will the mould separate cleanly from the pattern? And if not can I salvage the pattern for a second attempt? Will the mould be an unblemished copy of the pattern or will there be air bubbles or cavities or other defects that require yet more work? |
21-10-2018, 09:05 AM | #774 |
Registered User
Join Date: Jun 2018
Location: Clevedon
Bike: M1200s
Posts: 565
|
Try pre shaping the weights before fitting them, I still have some lead ones (I think they are lead) so it is easier.
__________________
Keep the rubber side down. Mick |
22-10-2018, 04:02 AM | #775 |
Too much time on my hands member
Join Date: Jan 2013
Location: Shipbourne
Bike: M900
Posts: 1,422
|
^^^^^ Trouble is the steel weights are about 3mm thick and not easy to bend to fit the rim. Any manipulation of them (bending them or cutting them with a hacksaw) means putting them in a vice and the (already marginal) self adhesive pad on the back does not survive this.
|
22-10-2018, 10:45 AM | #776 |
No turn left unstoned
Join Date: Jun 2010
Location: leicester
Bike: M750
Posts: 4,562
|
In the past, I've used pieces of lead flashing sheet and sticky rubber pads.
But proper weights are a more reliable proposition (and are available in 2.5g divisions). Then again, the carbon wheels probably deserve some lightweight, titanium ones ...... |
22-10-2018, 11:48 AM | #777 | |
.
Join Date: May 2007
Location: Stockbridge
Bike: M900
Posts: 1,984
|
Quote:
__________________
Original and Best since 1993 |
|
23-10-2018, 04:52 AM | #778 |
Too much time on my hands member
Join Date: Jan 2013
Location: Shipbourne
Bike: M900
Posts: 1,422
|
Whilst waiting for the moulds to cure completely I thought I would have a go at the calipers.
I have never really been a fan of Brembo gold brake calipers, it does not appear to be quite the same colour as the anodised disc carrier centre and is some way off the colour of the gold anodising on the forks and definitely doesn’t match Ohlins gold and is different again from the gold of the standard frame. I will go for a tasteful satin black but I am not sure whether to highlight the Brembo logo on the casting. The rear caliper (my original M900 one) came apart relatively easily and cleaned up nicely. Oddly only one of the two bolts holding it together showed any sign of Loctite. The front forks I am using are S4 (silver anodised, 25mm spindle and wider spacing caliper mounting bolts) so I had to buy second hand wider spacing calipers. There are 4 x M8 x 40mm socket cap screws holding the caliper together. With the first front caliper I tried to split, it became obvious why these calipers were sold, two of the bolts were seized solid and the socket head on one bolt was mullered so badly even the next size torx bit was sloppy. I shall leave them overnight with penetrating oil doing its best, but I have the feeling that this will be an absolute sod to get apart. As someone once said “ as a motorcycle mechanic you are always only one broken (or seized) bolt away from a 3 day nightmare”. At that point I did not have the mental strength to look closely at the other front caliper. My normal approach to this would be to resort to a 2lb lump hammer and / or an impact driver but there is no way to support the back of the caliper casting such that the force of the blow is directed through the bolt only and I am worried about damaging /distorting the caliper alloy casting. A second option is to apply my brazing torch flame to the internal hex on the socket screw and hope the differential expansion rate of steel and aluminium breaks the Loctite, but I still have no means of applying a turning force to the bolt head. I have little confidence that an “ease-it-out” will work as the shape of the casting is such that it will be very difficult to drill the bolt parallel and concentric to the bolt shank. Also the largest I could use would be about 4 to 5mm and I could end up with a worse problem of a broken hardened steel “ease-it-out” stub sticking out of a still stuck fast bolt. My current thinking is to find the largest size imperial (1/4”) allen key that will go into the socket head and cut about a 40mm length, (the “sacrificial” allen key). I already have some ½” square drive allen key holders where the allen hex bit is retained by a grub screw. I will then MIG weld the sacrificial allen key into the offending bolt (the heat should help with breaking the Loctite), remove the good allen key from my holder and fit my sacrificial allen key into my empty ½” square drive holder and thence to my electric rattle gun. The more I think about the more I am confident this will work – tomorrow will tell. |
23-10-2018, 07:17 AM | #779 |
.
Join Date: May 2007
Location: Stockbridge
Bike: M900
Posts: 1,984
|
Good luck!
There’s always Plan B though: sling it into a dark space under a bench and get another one. I’ve a pair of used 65mm mount Brembo calipers somewhere which I bought ten years ago and haven’t used. Haven’t so much as looked at them in years though, so no idea of condition now.
__________________
Original and Best since 1993 |
23-10-2018, 03:24 PM | #780 |
Lord of the Rings
Join Date: May 2013
Location: Norwich
Bike: M900sie
Posts: 5,984
|
The Allen key welding sounds favourite, but be careful with heat on the caliper in case you make a hot brake fluid gun! Best to have at least one piston out and preferably clean of old fluid, as it is very flammable stuff! More so than petrol.
I've got 4 calipers worth of these bolts to change. I seem to not be getting round to it!
__________________
|
|
|