Register | FAQ | Members List | Calendar | Today's Posts | Search | Contact |
|
Registered
Members: 675 | Total Threads: 50,942 | Total Posts: 519,443 Currently Active Users: 986 (0 active members) Please welcome our newest member, hp. |
|
|
Thread Tools | Rate Thread | Display Modes |
|
25-04-2017, 10:51 AM | #1 |
These must fit a Monster?
Join Date: Dec 2007
Location: Stockton Heath
Bike: Multiple Monsters
Posts: 1,036
|
Total, utter novice '97 M900 beer fuelled rebuild thread...
So after almost 10 years of being a proud member of the club I guess it's about time I posted up my own build thread...
The bike in question has been in the club a fair while, previously owned by Gordon H I nabbed it off him I think about three years back always with a mind to to spend a little time and money getting her spruced up. Nothing major every needed doing with her, purely cosmetic, and has run well before the project started. Personally I feel having an original M900 sitting alongside my track Panigale and Sunday toy Scrambler Cafe Racer is a garage to be proud of! I've a rather busy life, so this project was always going to be hard to fit in around it. I have a friend locally who's rebuilt a few Jap classics in the past and has a better equipped garage then mine so I dropped Bertha (Yes, her name is Bertha) off there a couple of months back and we've been finding late nights once a week to drink beer and take stuff apart. Also bear in mind I'm very much a technical novice. Handy round the house with DIY, a dab hand with computers, cameras and not too bad with electrics my revision for this project consisted of building a plastic V-Twin engine model kit a couple of years ago. I've very much been more a fan of paying money to those who are vastly more experienced and capable then I to do things. I'm posting the following just after dropping the engine out last night... "But why drop the engine out if it's just cosmetic stuff" I hear you cry?! Well, turns out the very first thing we noticed was a loose cylinder head nut, which turned out to be a known issue with the cylinder head studs snapping on that era of Monster. Rather amusing on another thread in 2011 Gordon H did in fact comment that perhaps he should get around to replacing the studs given the known issue and the age of the bike... oh if only! Still, it's been fun learning how to do all this. The timeline for the build could be an age, glaciers will move quicker then this thread will. Maybe on or two evenings during the week is all we tend to get to progress this. OK, so that's the introduction, a few picture posts to follow this to show the suits of the last few nights of work so I have what could well turn out to be an absolute money sink and disaster (Albeit a good learning experience) documented for posterity on the internet archives...
__________________
"Sometimes it takes a whole tankful of fuel before you can think straight." |
25-04-2017, 10:54 AM | #2 |
These must fit a Monster?
Join Date: Dec 2007
Location: Stockton Heath
Bike: Multiple Monsters
Posts: 1,036
|
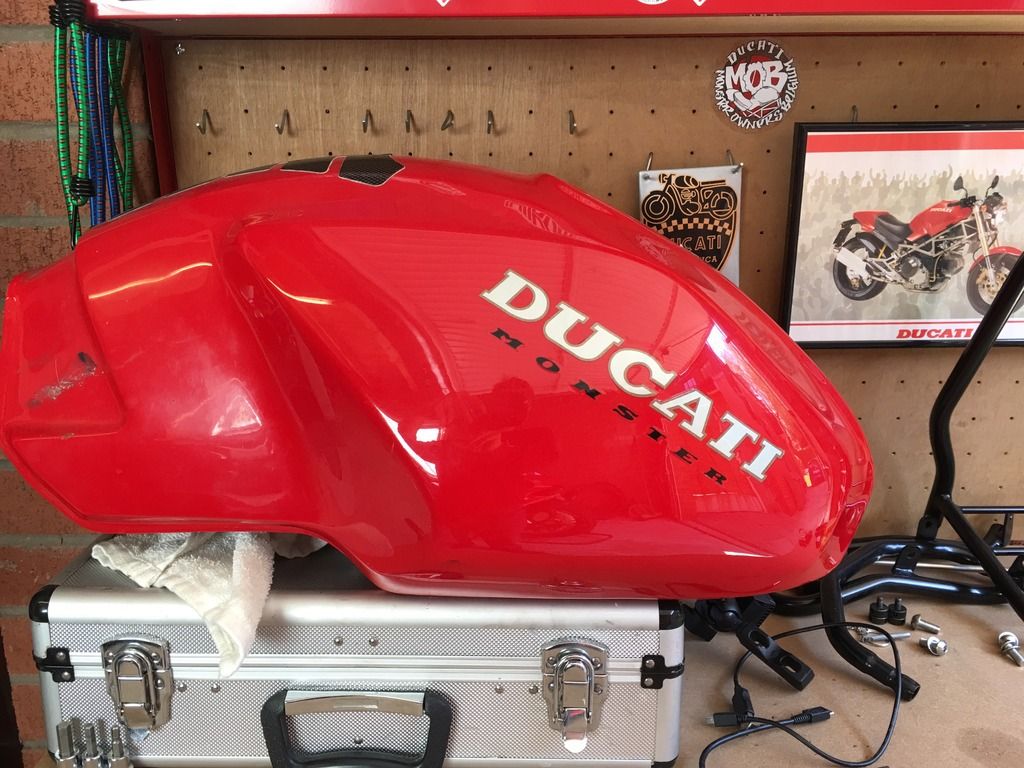
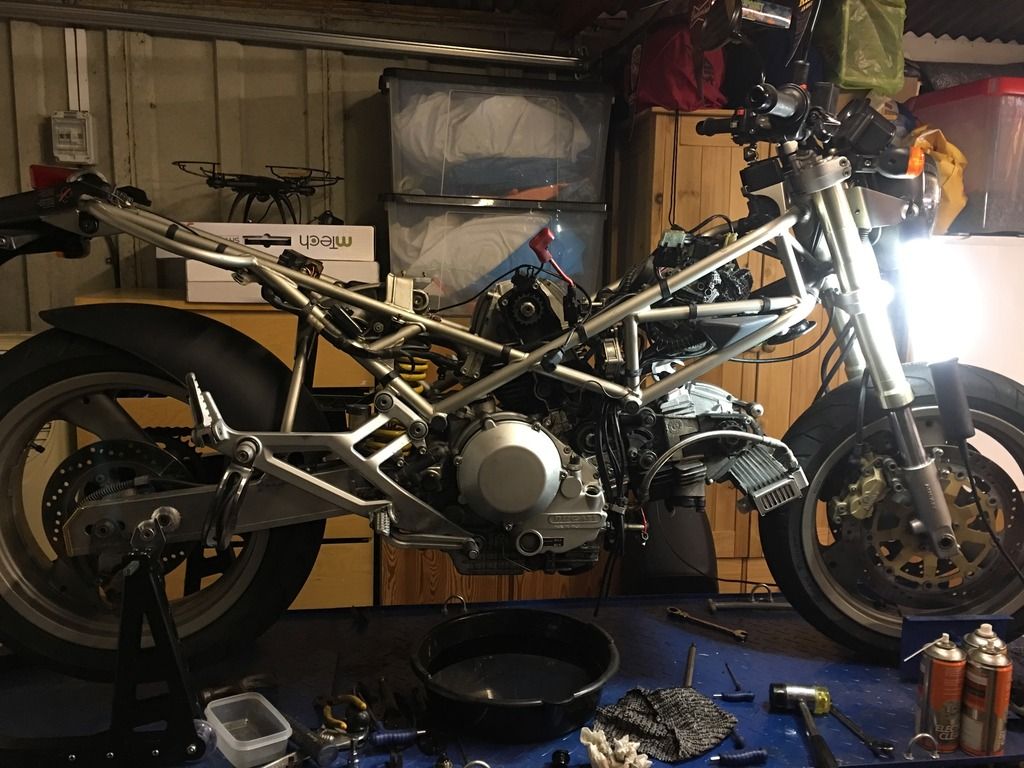
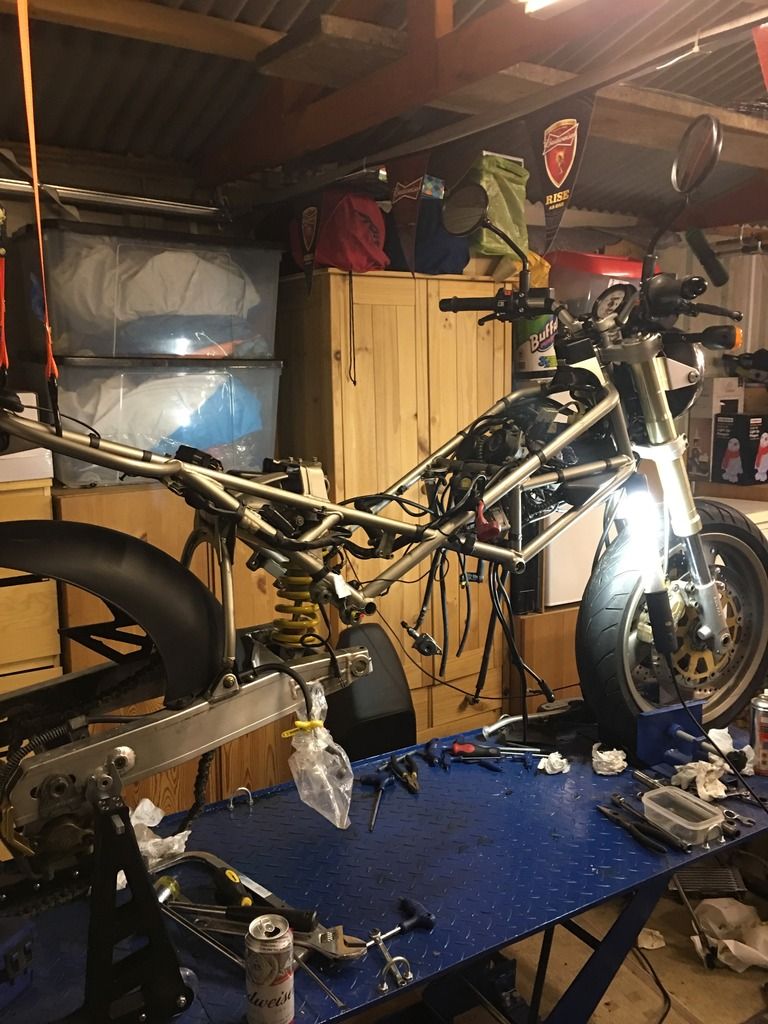
Early days, tank off to begin with. The current tank is actually a replacement from a 99 Monster I think. The original has a suspect slow leak in it somewhere, so I'm finding someone to completely braze the seal to be sure and then getting it resprayed as original as possible...
The original tank waiting to go off somewhere... A little further along... As of last night...
__________________
"Sometimes it takes a whole tankful of fuel before you can think straight." |
25-04-2017, 10:56 AM | #3 |
These must fit a Monster?
Join Date: Dec 2007
Location: Stockton Heath
Bike: Multiple Monsters
Posts: 1,036
|
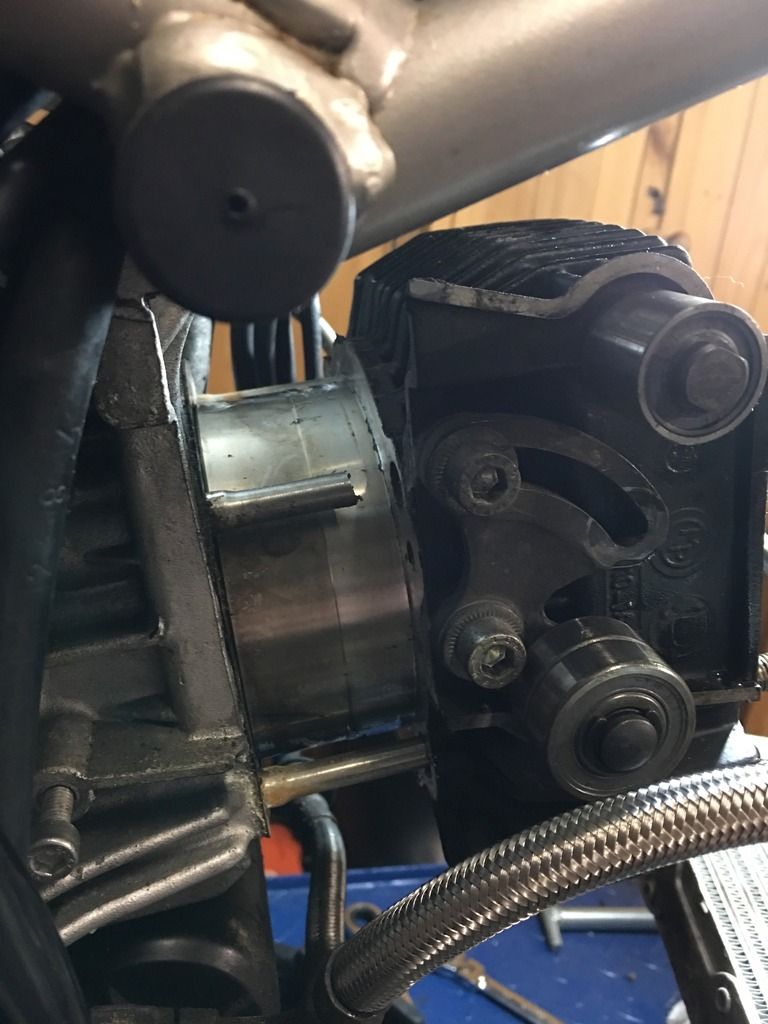
The culprit. Dropped the engine out as I've found a local engineer firm who are much much more capable then I to finish the job. Yes I know a lot of people on here would have a go with welding on nuts and other creative solutions, but I don't have the time nor the ability to try without high risk of ****ing it up further! As such I'm only too happy to make a new handy contact and give them some of my hard earned cash to do it properly!
__________________
"Sometimes it takes a whole tankful of fuel before you can think straight." |
25-04-2017, 11:56 AM | #4 |
.
Join Date: May 2007
Location: Stockbridge
Bike: M900
Posts: 1,984
|
I remember your bike well from when Gordon was running it in for you.
If you want to get back to originality, reverting to the original tank should get rid of the misfit where the seat wraps around the tank. You'll be wanting an original front disk too, to match the one with circular holes on the other side. There are a lot of m900 in this condition at the moment: must be something to do with birthdays?
__________________
Original and Best since 1993 |
25-04-2017, 01:13 PM | #5 |
These must fit a Monster?
Join Date: Dec 2007
Location: Stockton Heath
Bike: Multiple Monsters
Posts: 1,036
|
Yeah the shopping list for original parts is getting long, once the engine is sorted I'll be starting shopping for parts, although if any readers happen to know where I can source some original shaped discs from it would be handy. I've had a brief look around and can't seem to find any original looking discs?
As much as I've enjoyed customising my previous Monsters I must admit I've always liked the idea of having a bog standard model, even the micky mouse mirrors have an odd appeal!
__________________
"Sometimes it takes a whole tankful of fuel before you can think straight." |
25-04-2017, 05:39 PM | #6 |
.
Join Date: May 2007
Location: Stockbridge
Bike: M900
Posts: 1,984
|
You don't have to explain that to me.
__________________
Original and Best since 1993 |
25-04-2017, 09:34 PM | #7 |
Registered User
Join Date: Mar 2010
Location: Beachtown
Bike: M900
Posts: 2,188
|
Great Stuff!!
Am going to enjoy this as I have a '97 900 too and after eighteen years of ownership am quite attached to the old girl. Nothing wrong with sending bits off to get done either as long as you are confident they can do a good job. One thing I would say though is if you really must get the whole tank re-sprayed (I think personally I would just have it repaired - unless it is bad elsewhere as 1997 was the last of the factory hand sprayed tanks and you won't see the repair underneath) take lots of photos and dimensions of where the decals are positioned as all too often they get wrongly placed because of how the tanks sits off the bike and then when it's fitted are at the wrong angle and ruin the whole look.
__________________
You're perfect, yes, it's true- But without me you're only you! |
18-10-2018, 04:09 PM | #8 |
These must fit a Monster?
Join Date: Dec 2007
Location: Stockton Heath
Bike: Multiple Monsters
Posts: 1,036
|
So it's been a while... in the past 18 months I've moved house, got engaged, climbed several mountains, run many miles, and hiked many many more. Whenever possible I squeezed in a few hours on Monday night to head round to my friend's place to work on old Bertha, and today she passed the MOT with flying colours (Once I nipped up the rear brake adjustment so it actually worked)!
This has only been stage 1, as the main things we didn't do was get the frame and casings done. Mainly because time was dragging and I wanted to ride her and partly because it will be a nice project for me next year to do on my own in my new garage. I certainly expect it to be slightly easier then this first time and I hope never ever have to **** around with carbs again! For someone who started with zero experience of doing this before, only a couple or so hours a week, sporadically, and most times beer fuelled I reckon it's gone pretty well. Looking forward getting a few miles out of her before setting about the next bit of work! In summary the following has been done on her... Cylinder head studs replaced (http://www.mpeltd.co.uk) Rear shock serviced (https://www.kais-ohlins.co.uk) Exhaust pipes ceramic coated (http://www.camcoat.com) Original tank resealed (http://www.a-c-eltd.co.uk) Carbs stripped and ultrasonically cleaned (http://www.nrp-carbs.co.uk) Engine decoked New front discs & pads New rear pads New wheel bearings New belts New oil, fuel and air filter New engine casing bolts New starter solenoid New solid state battery Wheels powder coated, from silver to black Various new bolts, washers, battery straps and gromits replaced with new Replica mickey mouse mirrors New rear light Everything cleaned! New oil level sticker! Promise of my first born to https://www.stein-dinse.biz On the list for stage 2: Frame powder coated Rear sets & casings painted Original tank resprayed (Original logo) now the seal has been redone On the look out for: Original seat (As likely current seat won't fit original tank) Seat cowl (Hoping the one i have scrubs up alright but expecting not)
__________________
"Sometimes it takes a whole tankful of fuel before you can think straight." Last edited by LouSCannon; 18-10-2018 at 04:56 PM.. |
18-10-2018, 04:50 PM | #9 |
Gold Member
Join Date: Mar 2009
Location: widnes
Bike: M1100s
Posts: 780
|
It's looking good James but loose those boxes ...
Is that the church in Daresbury... |
18-10-2018, 08:50 PM | #10 | |
Lord of the Rings
Join Date: May 2013
Location: Norwich
Bike: M900sie
Posts: 5,976
|
Quote:
At the risk of sounding like your hand wringing Auntie, please do be careful when adjusting the rear brake free play. (You probably already know this) If you go below the recommended amount of free play, which from memory I think is 2mm at the stop, there is a danger that the brake will bind on, after an unpredictable amount of miles. I fell for this myself the very first time out on my present Monster. Just before the MOT, I adjusted the lever up for nice crisp operation with next to no free play. MOT was a formality, but about a mile after that the bike ground to a shuddering halt with the rear brake stuck on. I got home in quarter mile hops as the brake bound and then freed when cool. It was inconvenient for me, but not so funny if you happen to be giving it some beans!! Very nice photo, as usual from yourself.... I particularly like the crepuscular ray..
__________________
|
|
18-10-2018, 04:48 PM | #11 |
.
Join Date: May 2007
Location: Stockbridge
Bike: M900
Posts: 1,984
|
Coming on nicely, and just a little quicker than my rebuild!
Just a thought: the seat bases are the same moulding, but with a different trim to the front corners to fit the cut outs in the tank. If you can’t find a good original seat, you may be able to get yours re-covered as the earlier shape?
__________________
Original and Best since 1993 |
18-10-2018, 05:22 PM | #12 | |
These must fit a Monster?
Join Date: Dec 2007
Location: Stockton Heath
Bike: Multiple Monsters
Posts: 1,036
|
Quote:
How much you got left on yours?
__________________
"Sometimes it takes a whole tankful of fuel before you can think straight." |
|
18-10-2018, 08:07 PM | #13 |
Guest
Posts: n/a
|
Well done you ,
........personally I could not get through that much bud....stuff gives me a head ache!.....the monster looks a belter too so no excuses now Jim. You know where the lockgate is
|
18-10-2018, 04:53 PM | #14 |
These must fit a Monster?
Join Date: Dec 2007
Location: Stockton Heath
Bike: Multiple Monsters
Posts: 1,036
|
Those boxes were hard earned... particularly as that was basically how I was paying storage rent to my friend!
Appleton Thorn church, MOT'd at Grappenhall Motors...
__________________
"Sometimes it takes a whole tankful of fuel before you can think straight." |
18-10-2018, 08:10 PM | #15 |
These must fit a Monster?
Join Date: Dec 2007
Location: Stockton Heath
Bike: Multiple Monsters
Posts: 1,036
|
That was only a few weeks, my friend drinks like a fish! I barely got chance to make a dent in it (and agreed it’s like **** but was on offer most of the time)!
Friends 40th down in Essex for the next one... it’ll happen one day I promise!!!
__________________
"Sometimes it takes a whole tankful of fuel before you can think straight." |
Tags |
1997, m900, project, rebuild |
|
|